Setting Up Picade Max
Congratulations on buying the best arcade machine available! This guide will walk you through installing two of the popular retrogaming platforms onto the SD card or solid-state drive of your Raspberry Pi.
We'll be discussing two different software options in this guide:
Recalbox is a user-friendly platform that lets you play games from more than 100 different gaming systems, including consoles, arcade machines, computers, and handheld devices. It uses a system called RetroArch to work.
RetroPie is a long-time favourite of many people and is installed on top of Raspberry Pi OS. This means you will have all the familiar functionality of the Raspberry Pi OS with the addition of a retrogaming platform.
In this guide we'll be showing you how to:
- install Recalbox or RetroPie to your SD card
- setup the power button to turn off your Picade safely
- transfer files to your Picade Max
- change the button settings to make your controller feel like the one you like best
- make sure the sound and volume control is working correctly
Recalbox and RetroPie come with some free emulators and games already installed, but you can also add your own. We'd encourage you to obtain game ROMs and BIOS files by legitimate means - it's important to support the creators for their hard work, no matter how long ago they made them.
What you'll need
- An assembled Picade Max kit with a Raspberry Pi 5 installed in it*. If you've not yet assembled your Picade Max our online assembly guide can be found here.
- A microSD card
*If you want to use an older Pi with this kit that's also possible (as long as it's one of the ones with a 40 pin header). These instructions should still work as long as you flash the correct OS for your version of Pi.
Prerequisites
Download and install Raspberry Pi Imager on your computer (it's available for Windows, Mac and Linux). We'll be using this to load the platform of choice onto your SD card.
Whilst an 8GB card microSD card would work, we recommend that you use one that's at least 16 GB to allow you to install all the platforms and games; the larger the card, the more you can install on it.
Recalbox
Right now, Recalbox is the simplest retrogaming platform to set up thanks to it being an option within Raspberry Pi Imager. It also comes with a bunch of free games built in, so it's a great choice if you're a beginner.
Installing Recalbox
Start Raspberry Pi Imager on your computer.
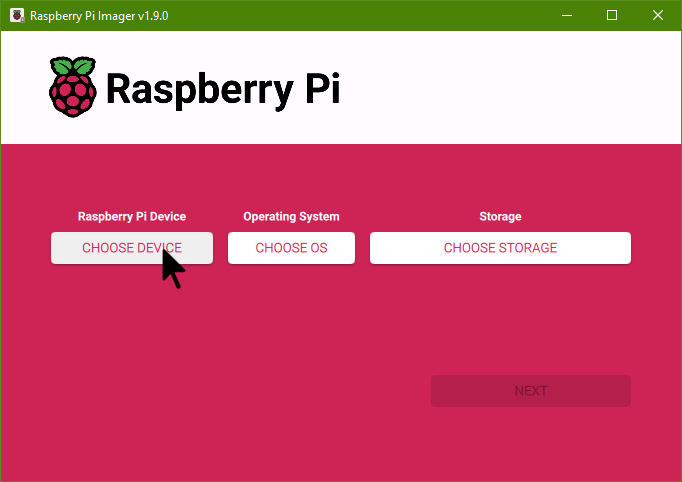
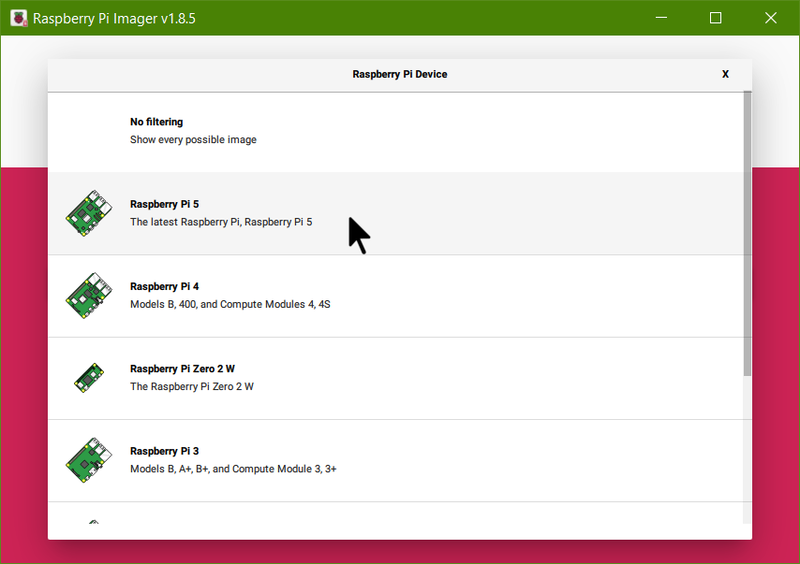
Click on Choose Device and then pick Raspberry Pi 5.
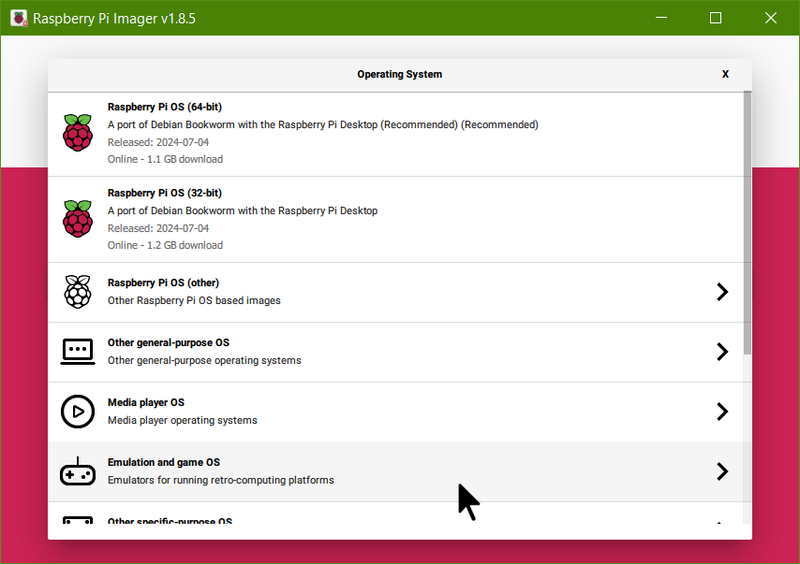
Next, click on Choose OS and then scroll down to find Emulation and Game OS.
Here, you’ll find the options for the emulator. Right now, the only one available for the Raspberry Pi 5 is Recalbox.
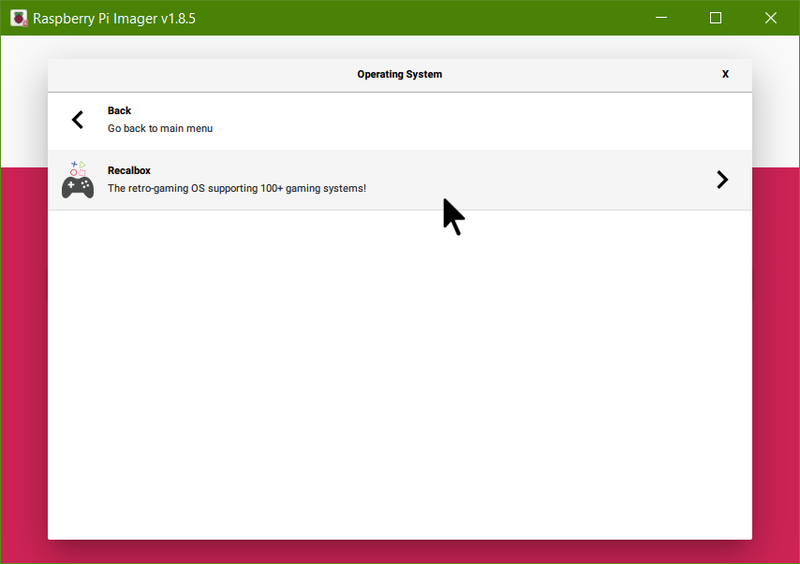
Choosing Recalbox will bring you back to the main Imager screen.
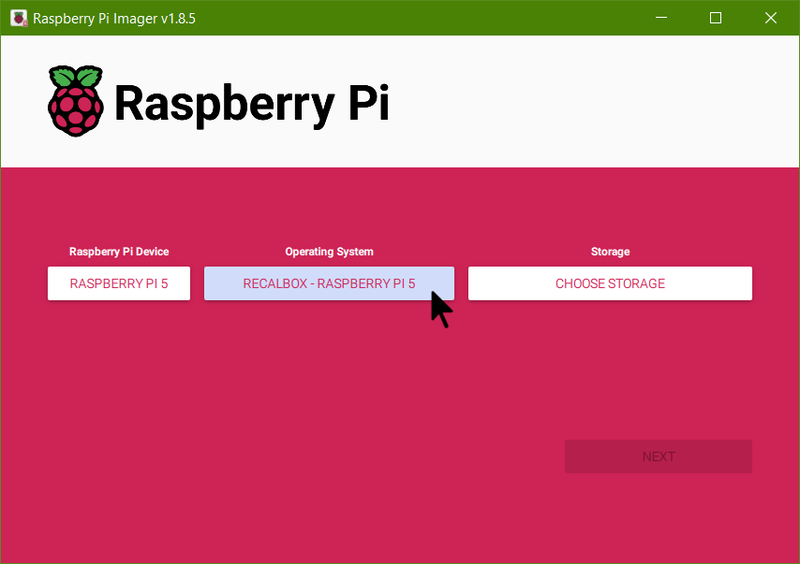
Insert an SD card into your card reader, then click on Choose Storage. You will see a list of storage devices. Select your SD card.
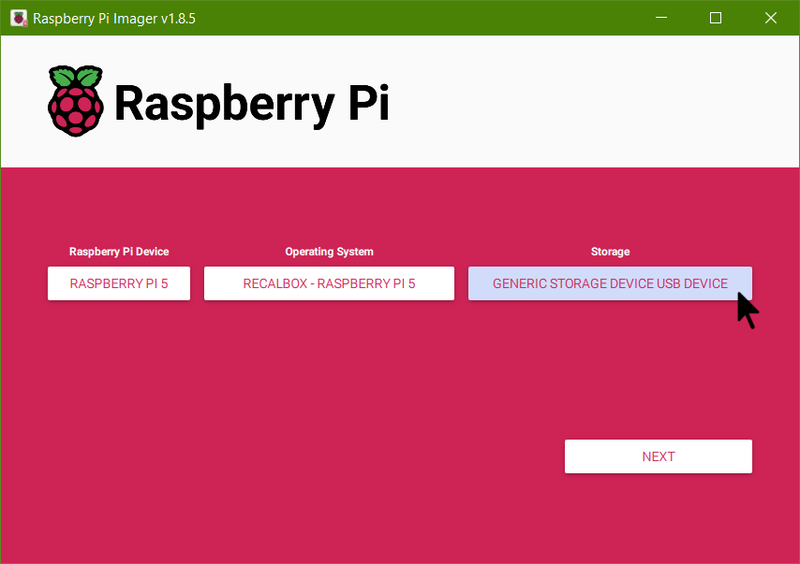
By clicking Next, you’ll be notified that all data on your SD card will be deleted. Click Yes to confirm that you want to install Recalbox on the SD card.
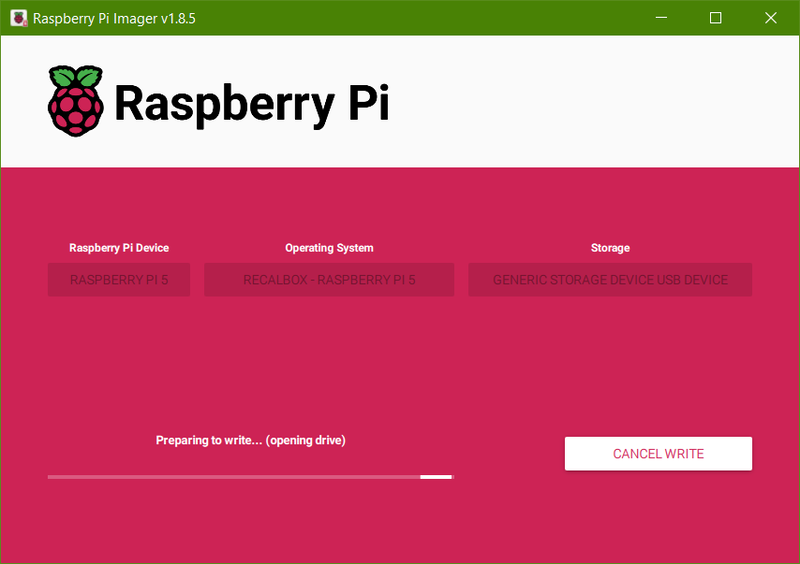
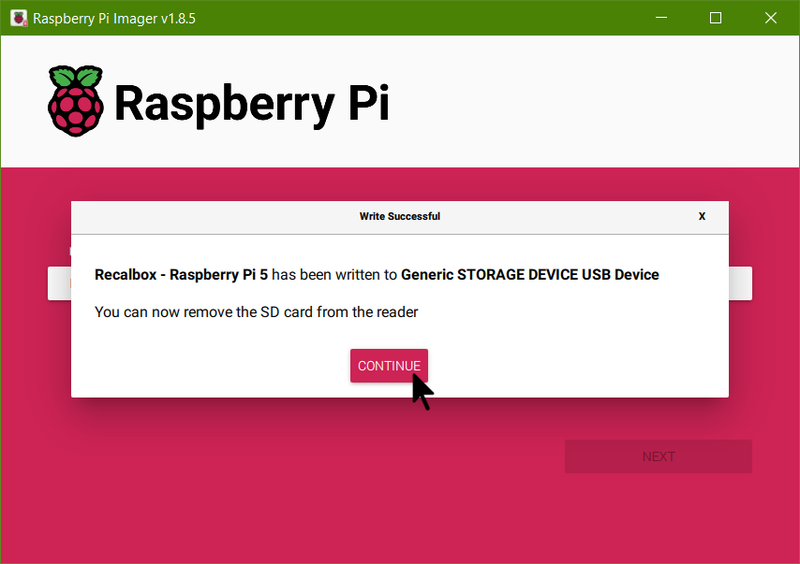
Wait for the card to finish writing. Once it's done, take the card out of your card reader and put it into the Raspberry Pi 5 inside the Picade Max.
Press the button on the left side of the Picade Max to turn it on, and then wait for Recalbox to load up.
Recalbox will start with a few basic emulators and games, but you can easily add more whenever you like. You'll only notice the emulators that have games added.
Controlling Recalbox
When you turn Recalbox on for the first time, the buttons and joystick controls should be pre-configured to be as shown in the images below (depending on if you have built the Picade Max for two or one player, and assuming you've connected up the buttons to the correct terminals on the USB Controller board!). The in-game controls are shown on the buttons here, with the Recalbox menu controls shown within [brackets] under the buttons.
For the two controller setup, this is:
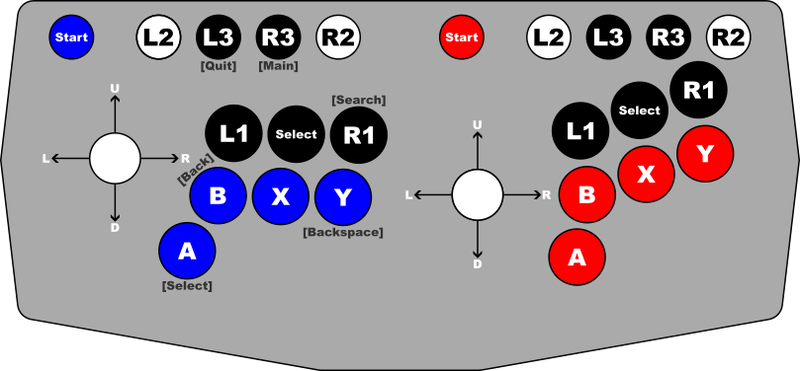
For the single controller setup, this is:
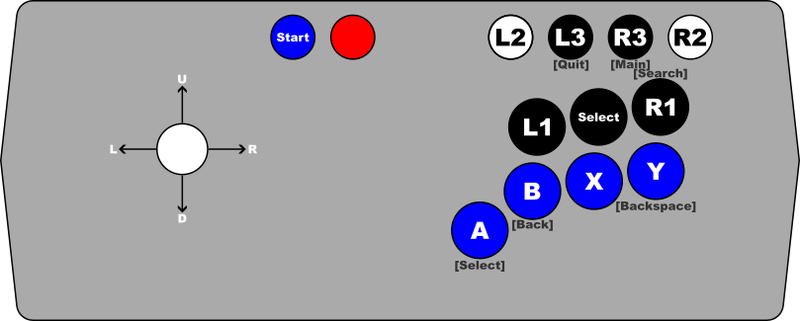
There is another button on the right hand side of the Picade Max, known as the ‘Hotkey’. More about that later!
Navigating Recalbox
When you boot Recalbox this is a typical image of what you will see:
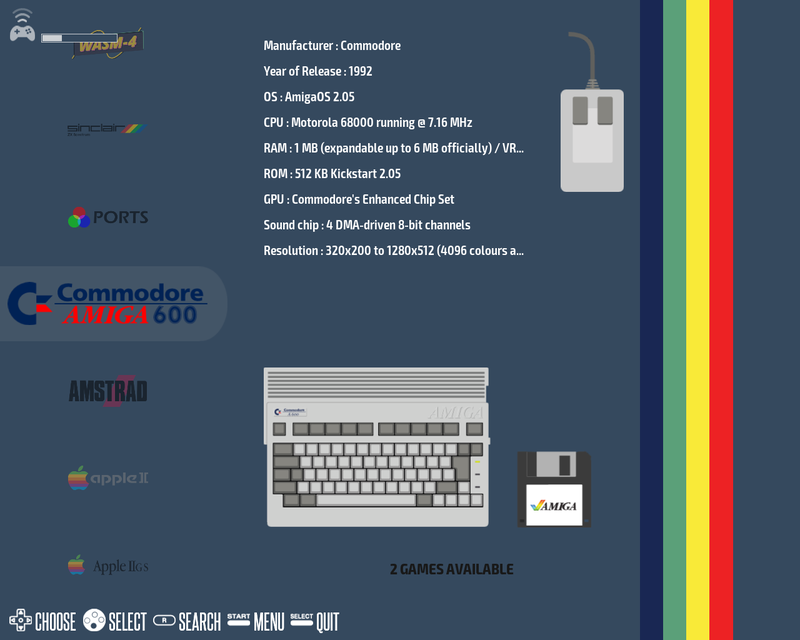
Move the joystick up and down to choose between different emulators. Press the ‘A [Select]’ button to pick the one you want to use. Once the list of games is shown, use the same actions to navigate the list and start a game.
Hotkey Combinations
On the right hand side of the Picade Max is a black button called the ‘Hotkey’, which can be used in combination with other buttons to control RecalBox. You will find the following button combinations helpful.
- ‘Hotkey’ + ‘R3 [Main]’ to return to the home screen.
- ‘Hotkey’ + ‘A [Select]’ to bring up the in-game quick menu, allowing you to load and save game states so you can carry on playing later. It also enables you to change the controls used in the game.
- ‘Hotkey’ + ‘B [Back]’ to reset the game
- ‘Hotkey’ + ‘L1’ to save a screenshot (these are stored in the folder
/share/screenshots)
Change Recalbox Settings
Recalbox has a lot of different settings. We’re not going to take you through them all because that would take a long time! However, here are some of the most important ones. You can change Recalbox settings from the Main Menu, accessed by pressing the ‘R3 [Main]’ button.
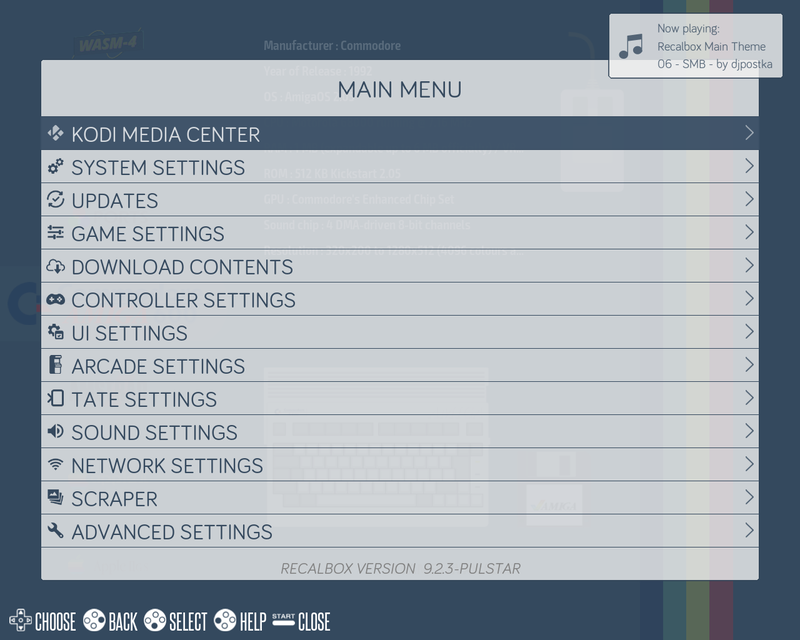
Use the joystick to navigate through the options, and press 'A [Select]' to open a sub-menu or choose an option. To return to the previous menu, just hit the 'B [Back]' button. To find a specific game, just click the 'R1 [Search]' button. Use the onscreen keyboard to spell out the name of the game, using the 'Y [Backspace]' to delete a character if you made a mistake.
You can shutdown or restart Recalbox using the Quit menu by pressing the ‘L3 [Quit]’ button.
Changing Game Controls
You might find that the default controls don't work well for you for some games you play. In Recalbox, you can change which buttons do what. Open the settings menu using the ‘R3 [Main]’ button and use the joystick to move down to Controller Settings.
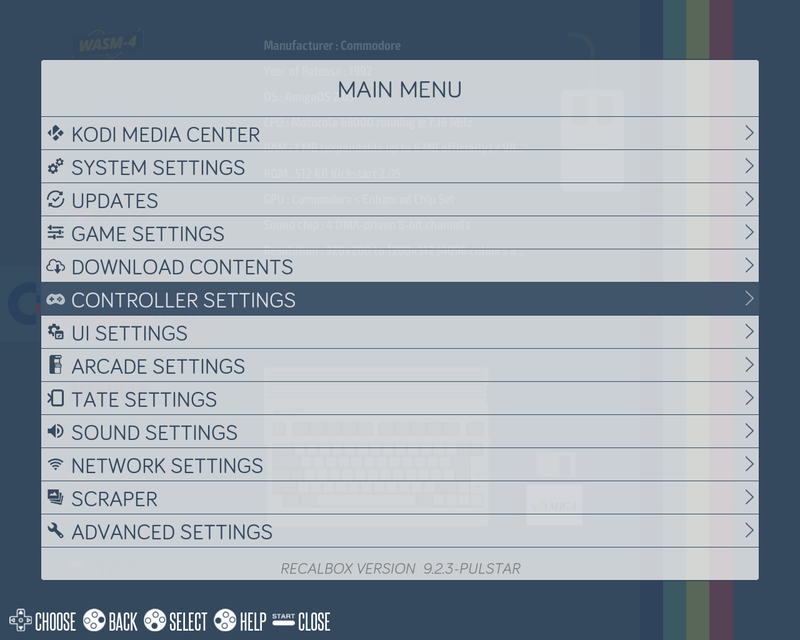
Press the ‘A [Select]’ button to open the controller menu:
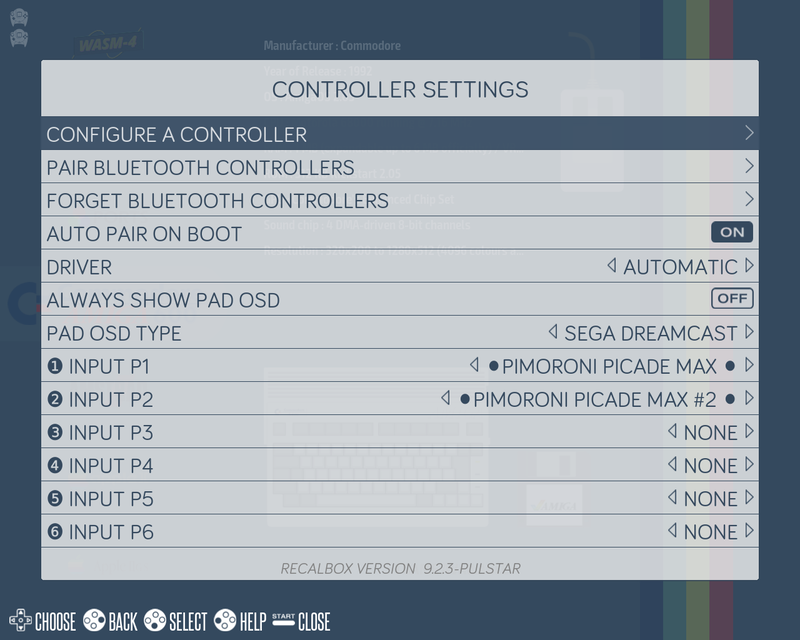
Press the 'A [Select]' button to select Configure a Controller:
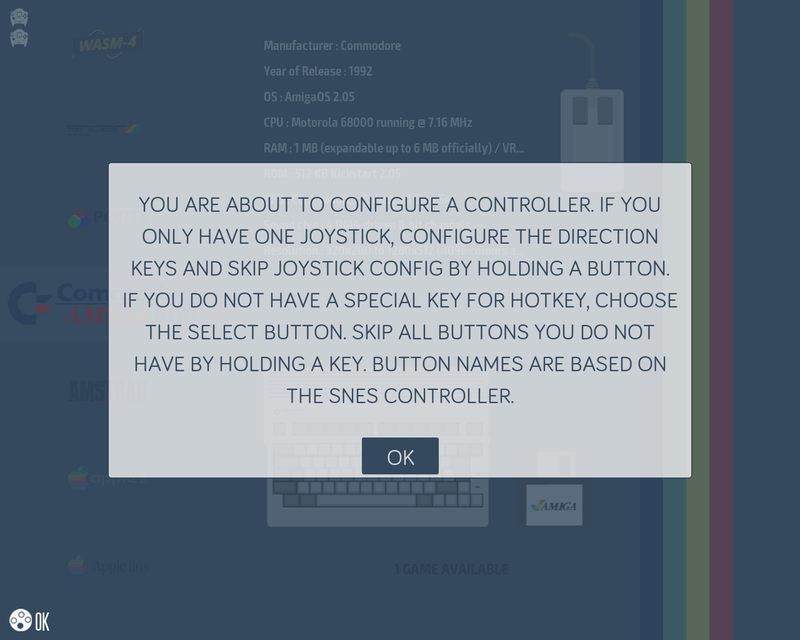
After reading the text, press 'A [Select]' again:
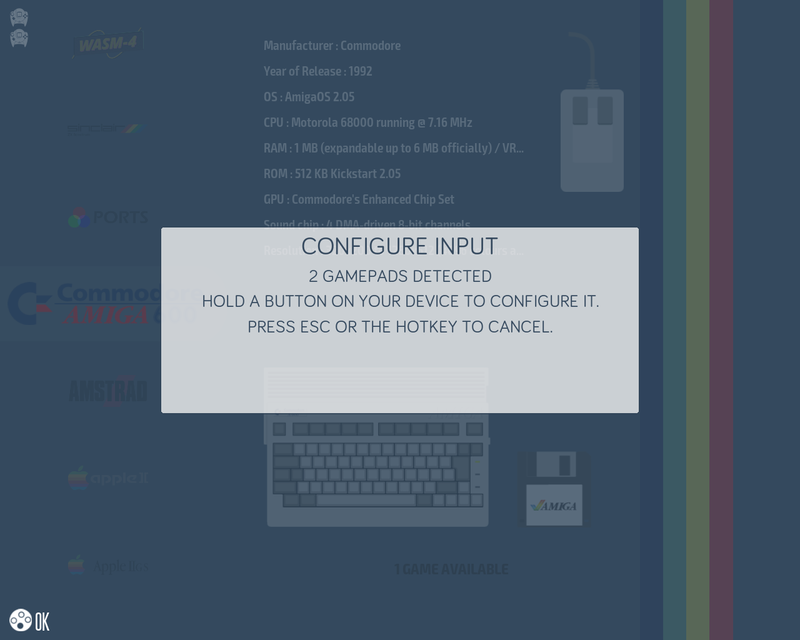
Recalbox will see that you have two controllers connected, even if you are only using the one player layout, and will ask you to choose one to set up. To do this, press and hold the chosen controller’s ‘A [Select]’ button until the setup menu shows up.
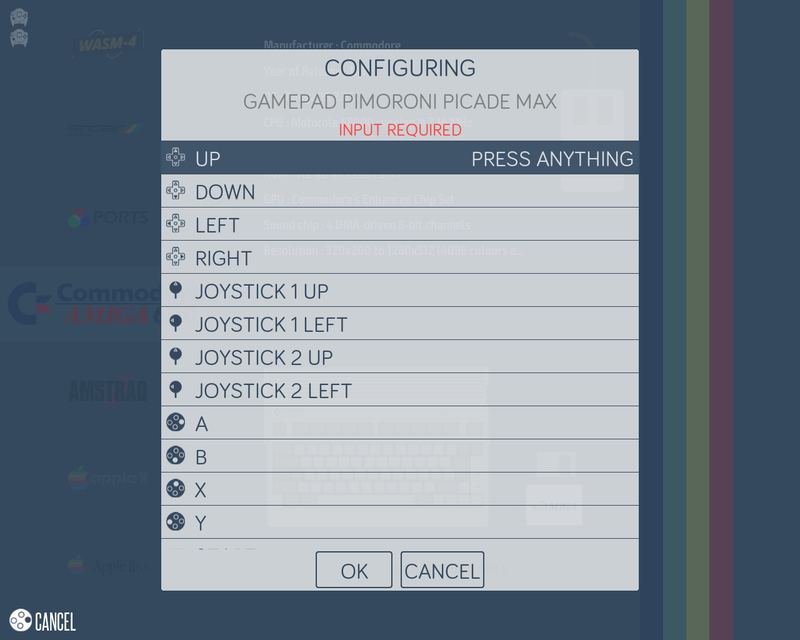
You can now change the buttons for each action by pressing the one you want for each action. Just keep in mind that this will also affect how you move around the Recalbox menus. It might be best to wait until you have everything set up the way you want before making these changes.
You can do the same thing for the other controller. You can also set up different controller settings for each emulator, but we won't go into that here. For more information, please check out the Recalbox Wiki.
Setting up a Network to add Emulators and Games
If your Picade Max isn't hooked up to your network with a cable, you'll need to use WiFi instead. Start by going to the main menu and choosing Network Settings.
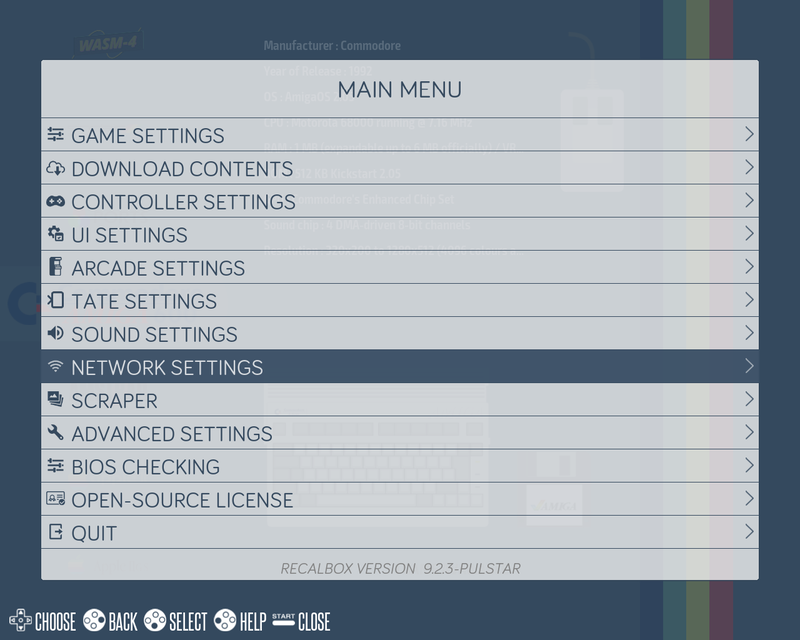
Scroll down to Enable Wi-Fi and enable it by pressing ‘A [Select]’.
Move to Network Name and use left/right on the joystick to scroll through available networks.
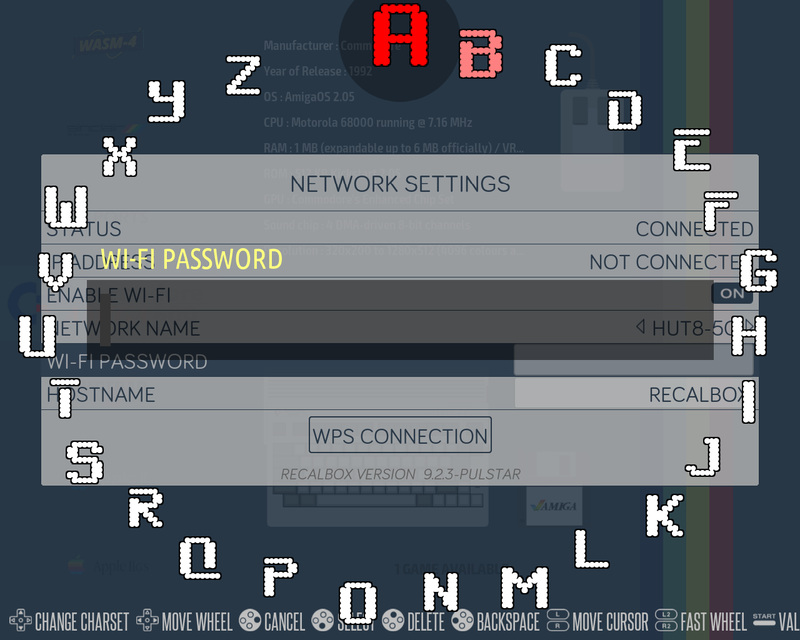
Once chosen, scroll down to Wi-Fi Password and hit ‘A [Select]’.
If you have a keyboard connected, just type in your password. If you don’t, you can use the on-screen keyboard. Move the left and right joysticks to choose a letter. Use the up and down movement to switch between lowercase letters, numbers, and symbols. Press ‘A [Select]' to choose a letter, and the ‘R3 [Main Menu]’ button when you have entered the whole password.
Here is an example of the network settings once everything is set up.
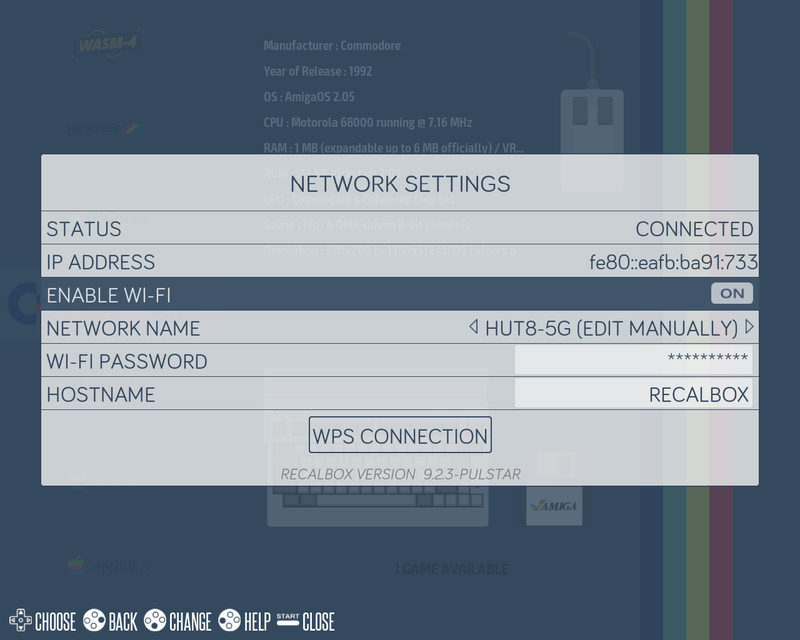
You might need to restart your device to connect to Wi-Fi.
You can connect remotely to Recalbox in three helpful ways once you have a network connection:
- Shared folder access
- The Recalbox web manager
- Login via ssh
Access the web manager from your computer by browsing to http://recalbox (or whatever name you have used as the hostname). From there you can see the installed emulators and games, monitor your Raspberry Pi and make settings changes.
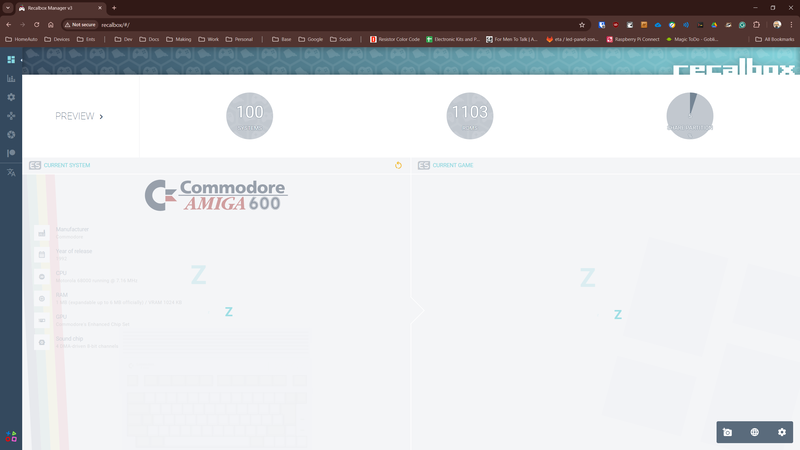
Adding Emulators and BIOS Files
Some emulators require BIOS files to work - these provide firmware or an OS for specific emulation platforms. Before you look for a BIOS online, check whether Recalbox already has the emulator you want. The emulator won't show up in the list until you've added a game ROM. You can check this from the Main Menu by selecting BIOS Checking or by going to the Recalbox WebManager.
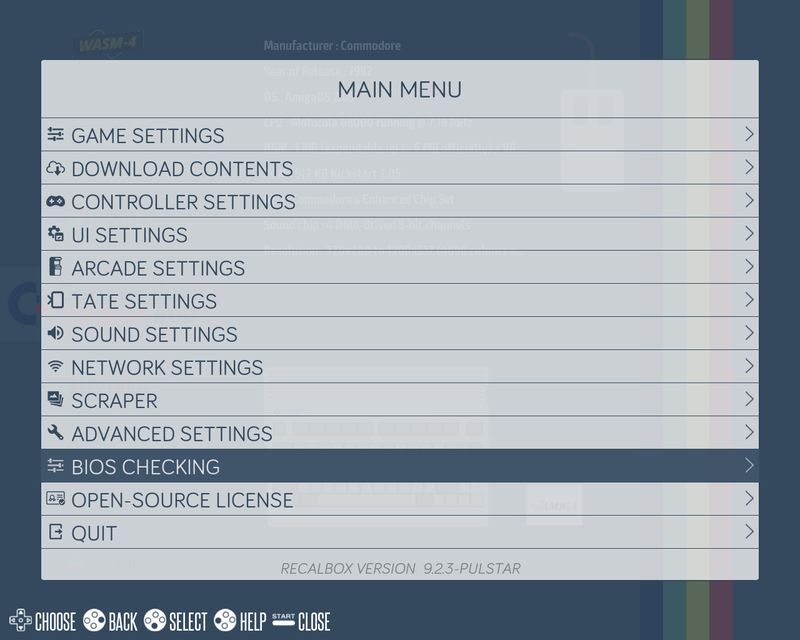
You will find a list of emulators that are working and not working, along with details on which ones might need extra BIOS files.
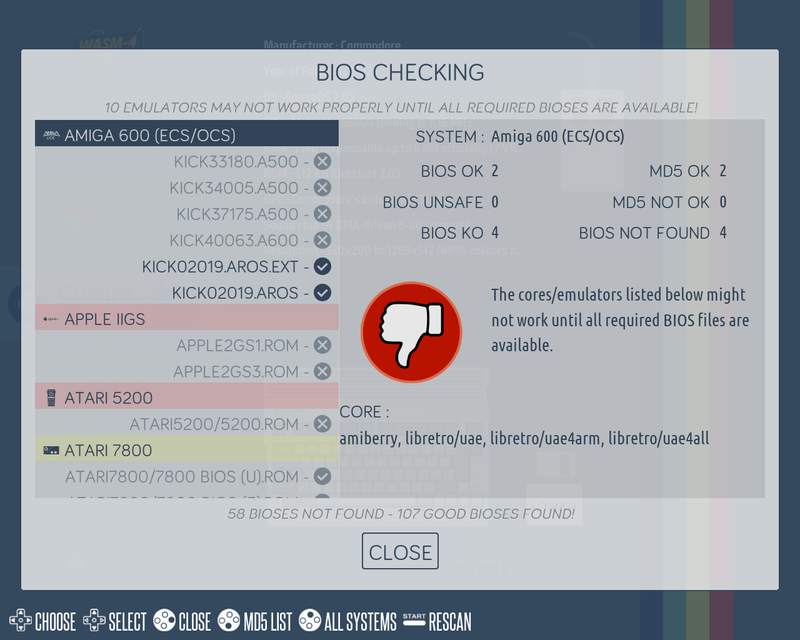
As you go through the list, you'll see that working emulators have a green thumbs-up, not working emulators have a red thumbs-down, and those that work partially have a yellow thumbs-up.
After you have located the BIOS files you need, transfer them to your Raspberry Pi. If you're using Windows, open File Explorer and type \\RECALBOX in the address bar, or you can use the IP address. You'll need to log in with the username root and the password recalboxroot.
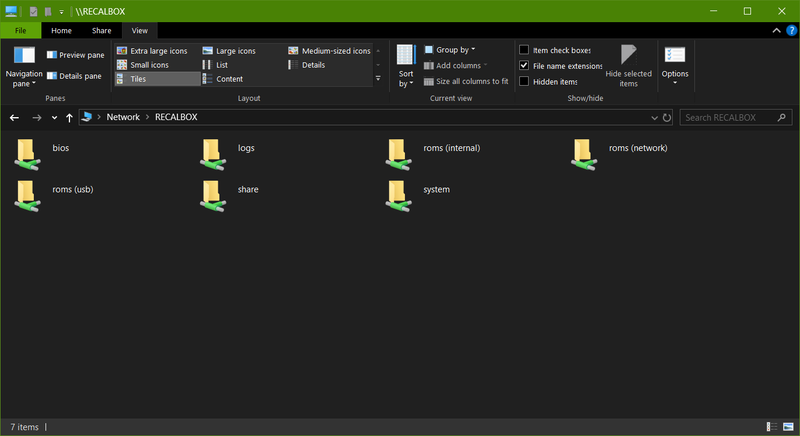
On a Linux machine, mount the BIOS folder with:
mkdir ~/recalboxbiossudo mount -t cifs //recalbox/bios ~/recalboxbios- When asked for the root password, use:
recalboxroot - You can also open the file manager and type
smb://RECALBOX/biosin the address bar. You can log in as an anonymous user without a username or password.
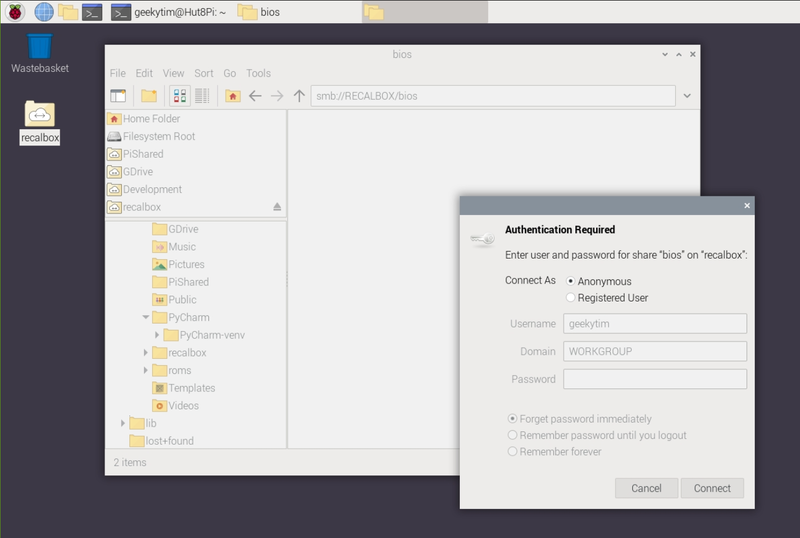
The 'bios' folder has a separate folder for each machine you want to emulate. Just put the additional BIOS files into the right folder.
You will need to restart Recalbox for the BIOS files to be recognised.
Adding Games (ROMs)
Recalbox comes with some games already installed. You can see the list of these games here.
You might want to add your favourite games too. Installing games is similar to installing BIOS files. Instead of placing them in the BIOS folder, you need to put them in the roms (internal) folder. Just make sure to place them in the specific subfolder that matches the emulator you are using.
You will need to restart Recalbox for them to be detected.
Configuring the Power Button
To make the power button on the left hand side of the Picade Max function, we need to make some setting changes.
Make sure that the Picade Max is connected to your network. Then, use a program like Putty or a terminal to connect using SSH (Secure Shell) to the Raspberry Pi. For example, if you’re using a Linux terminal, type the following to connect to your Recalbox:
ssh root@recalbox
When asked for the password, use ‘recalboxroot’.
The ‘boot’ folder must be mounted for writing so you can edit the configuration file. Type in the following:
mount -o remount,rw /boot
nano /boot/recalbox-user-config.txt
To make the power button safely turn off your Raspberry Pi, add these lines at the end of the file:
dtoverlay=gpio-shutdown,gpio_pin=17,active_low,debounce=2000
dtoverlay=gpio-poweroff,gpiopin=4,active_low
The debounce setting is optional, but makes it so the button has to be held down for 2 seconds (2000 milliseconds), to avoid accidental presses from turning off your Picade Max during your session.
Additionally, add this line to the file to ensure that the devices plugged into your Pi's USB ports receive the most power possible:
usb_max_current_enable=1
Reboot Recalbox for these to take effect.
Setting up Sound
The volume button is on the left side of your Picade Max. You can change the volume by turning the knob, and you can mute or unmute it by pressing the button.
If you notice there’s no sound at all (or if the mute button is misbehaving), it could be because Recalbox has the wrong audio settings.
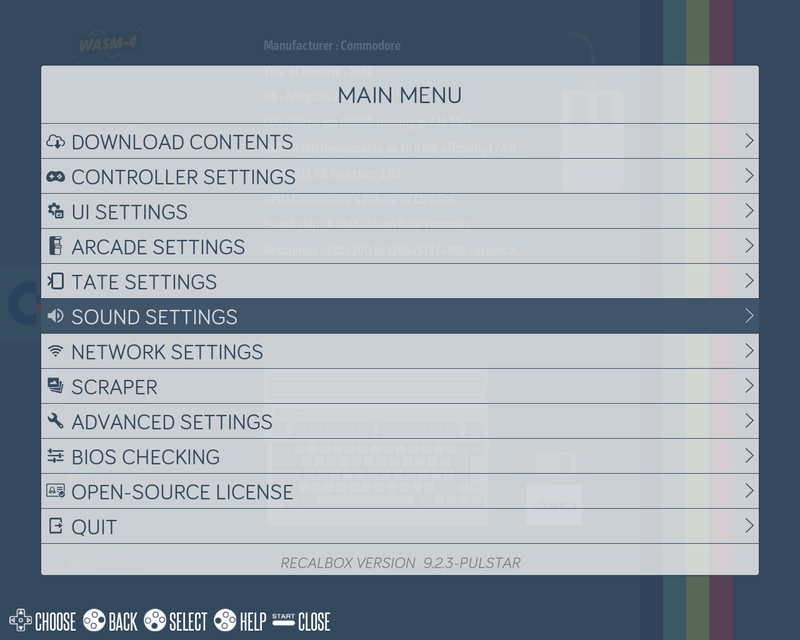
From the Main Menu (accessed by 'R3 [Main]'), go down to Sound Settings
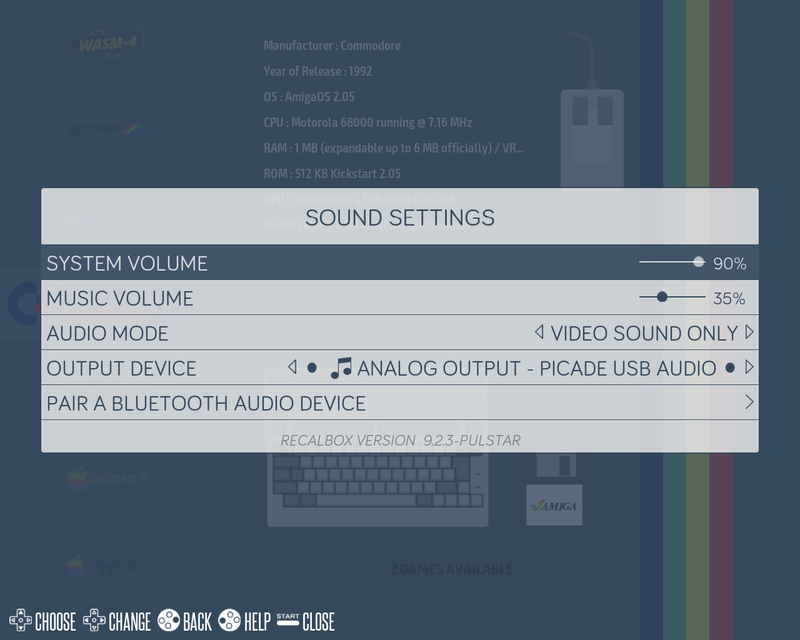
Press ‘A [Select]’ to open the sound settings menu:
Move down to Output Device, and press ‘A [Select]’.
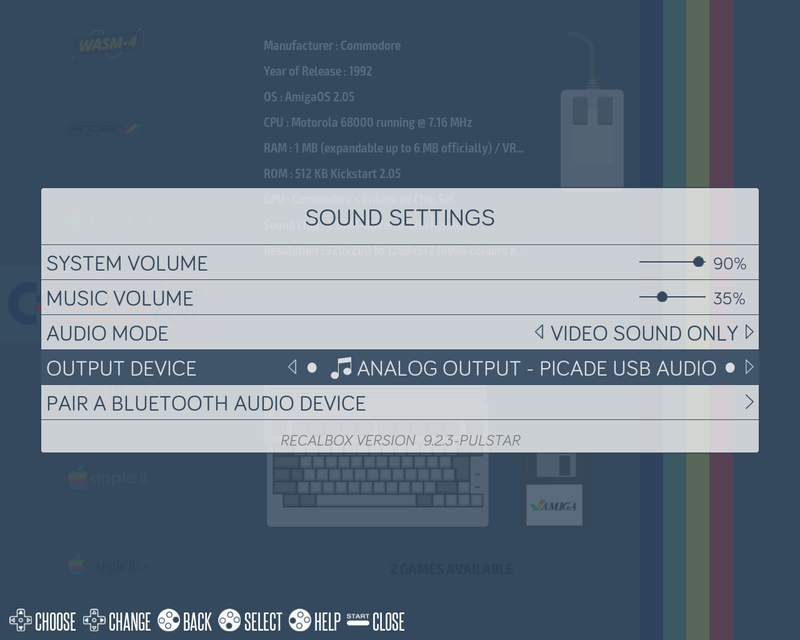
Scroll to Digital Output (S/PDIF) - PICADE USB AUDIO and select it with ‘A [Select]’.
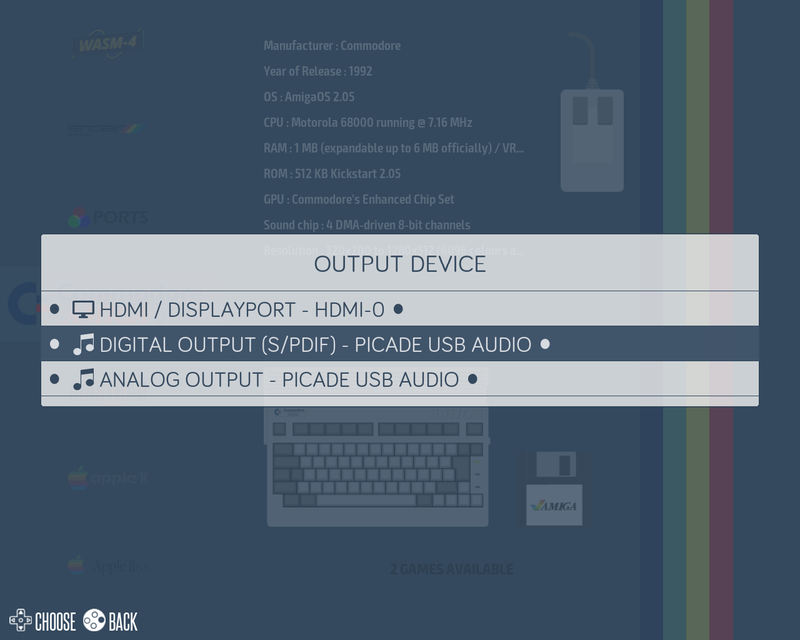
Return to the Recalbox platform page using ‘B [Back]’.
You should now be able to enjoy music and sounds from the speakers of your Picade Max.
Moving over to an SSD on your Pimoroni NVMe Base
If you’ve got a Pimoroni NVMe Base with an M.2 SSD you can move everything from the SD card to the SSD.
Connect to your Pi using SSH as shown above.
To check that your SSD is connected correctly, type:
ls /dev/nvme0
If the SSD cannot be found, the terminal will report:
ls: cannot access \'/dev/nvme0\': No such file or directory
In which case, turn off your Raspberry Pi and recheck the ribbon cable connections and the SSD installation. Remember that the clips on both the NVMe Base and Raspberry Pi 5 need to be folded/pressed back in place for the connections to work. Use this tutorial if you need help.
If the SSD is correctly connected, /dev/nvme0 will be repeated back in the terminal. All is good and you are ready to proceed. Perform the copy by typing:
dd if=/dev/mmcblk0 of=/dev/nvme0n1
Once everything has been copied over to the SSD, shutdown the Pi, remove the SD card, and restart the Pi. Recalbox should now be booting from the SSD. If it does not, you might have an old version of the firmware on your Pi, in which case you will need to prepare another SD card with Raspberry Pi OS Lite, put that in your Pi, boot it and follow the steps in our NVMe Base Learn Guide to update the firmware.
RetroPie
RetroPie has been available for a while - it's very customisable, with a great community behind it. It's not included in the Raspberry Pi Imager for the Raspberry Pi 5 right now though, and you can't use the versions designed for older Raspberry Pi models. As such, setting it up takes a bit more effort than using Recalbox.
Preparing the Operating System
You're going to start with a basic Raspberry Pi OS image, so fire up Raspberry Pi Imager. We'll be using the Lite version as we're planning on connecting to our Pi 'headlessly' from another computer, but if you'd like to have access to the Raspberry Pi graphical interface you can use the Full/Desktop version instead.
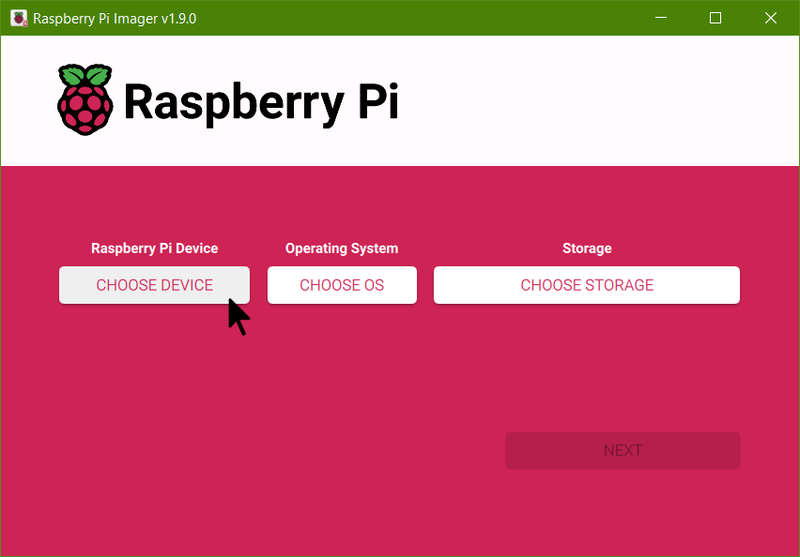
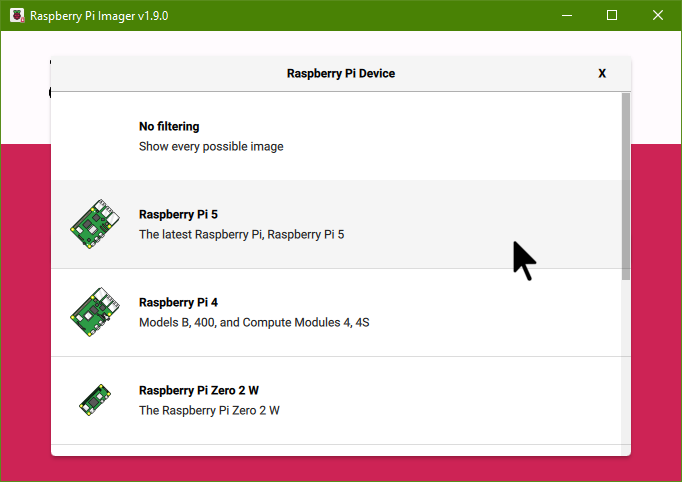
Click on Choose Device and pick Raspberry Pi 5.
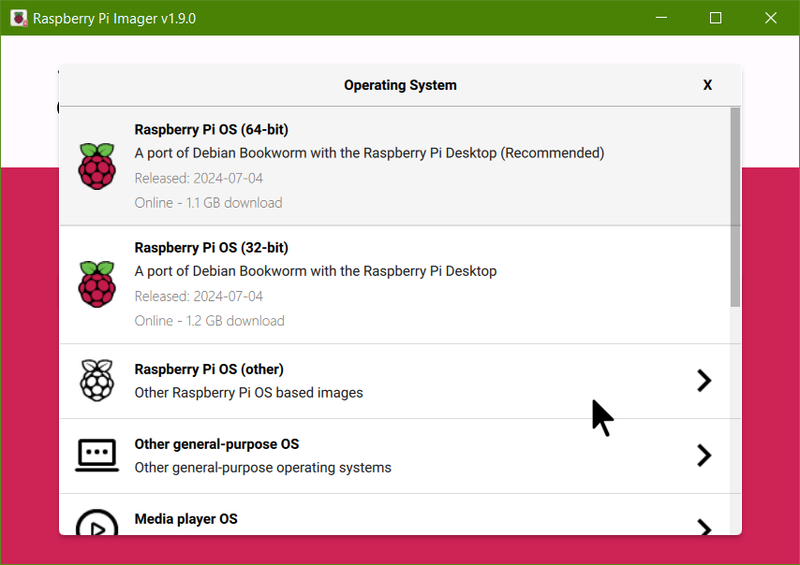
Click on Raspberry Pi OS (Other):
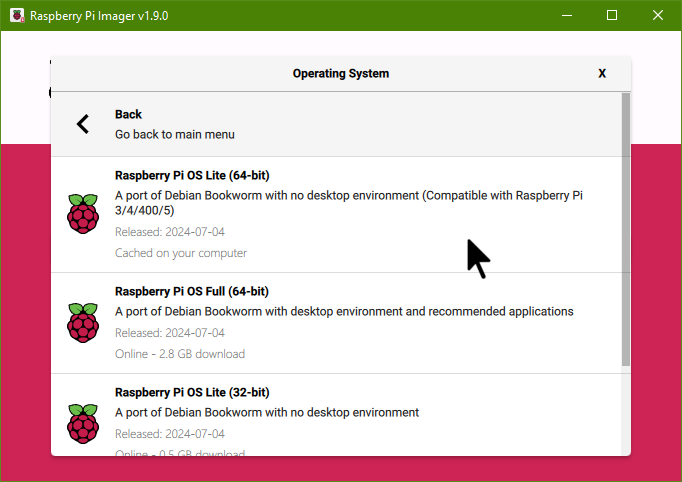
Select Raspberry Pi OS Lite (64-bit):
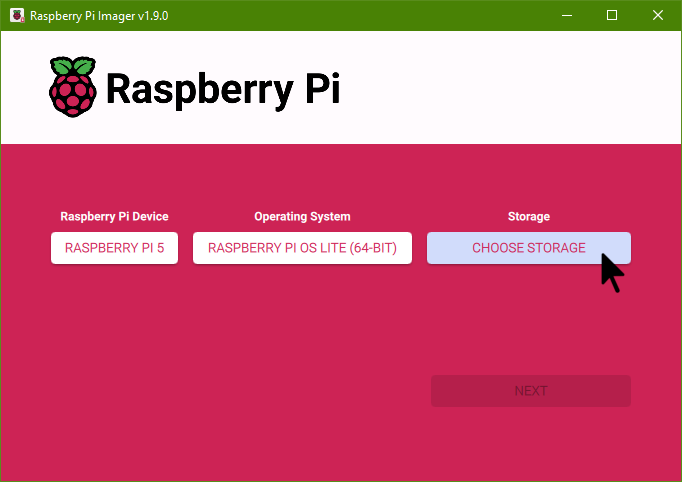
On the next screen, click on Choose Storage:
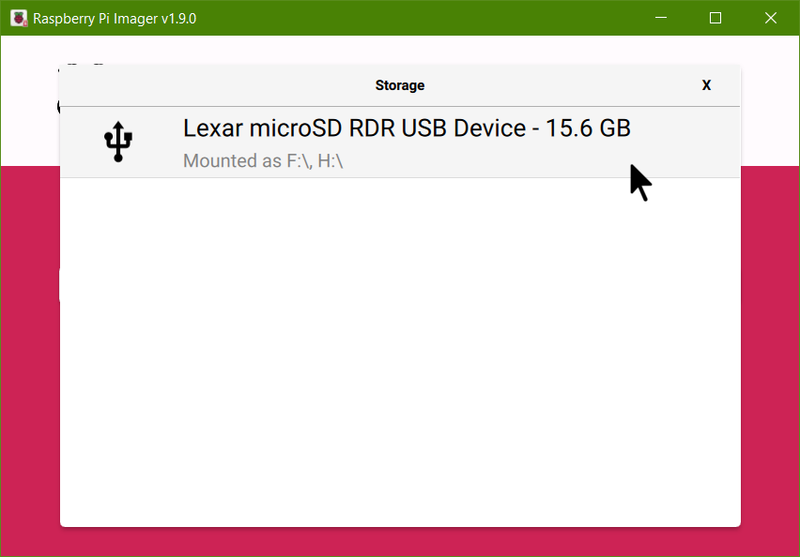
Select your SD card:
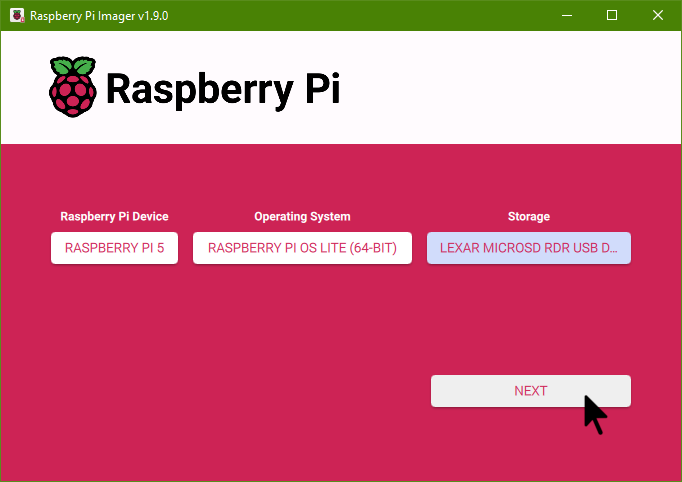
Select Next to start writing the OS to the SD card:
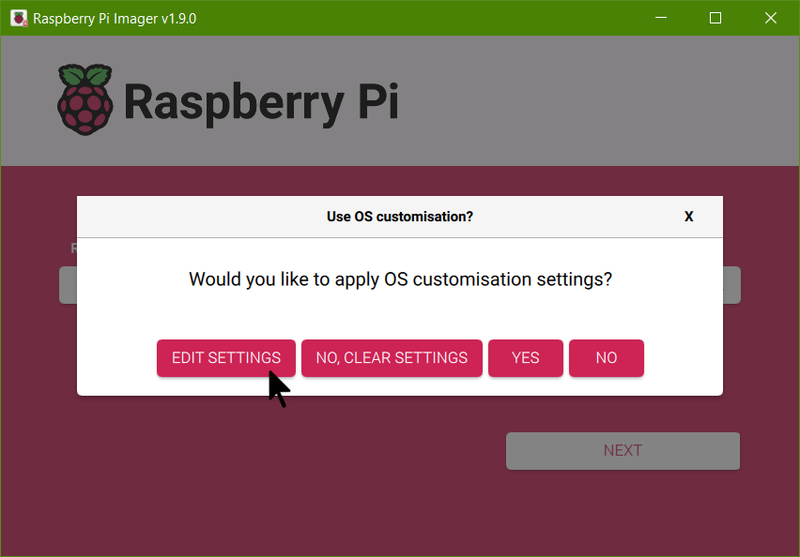
But before you start, you need to set up the operating system so you can log in from another computer using SSH. Click on Edit Settings:
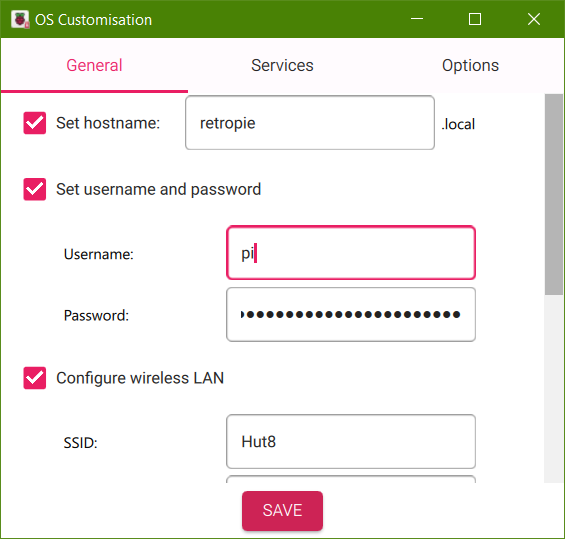
In the General Tab, change the device name to RetroPie, update the password to something new, and set up your WiFi connection.
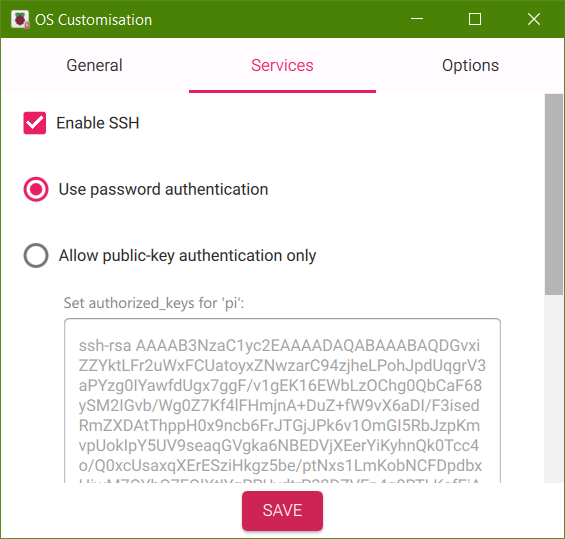
In the Services section, turn on SSH so you can log in from another location and transfer files using SFTP. Then, click Save.
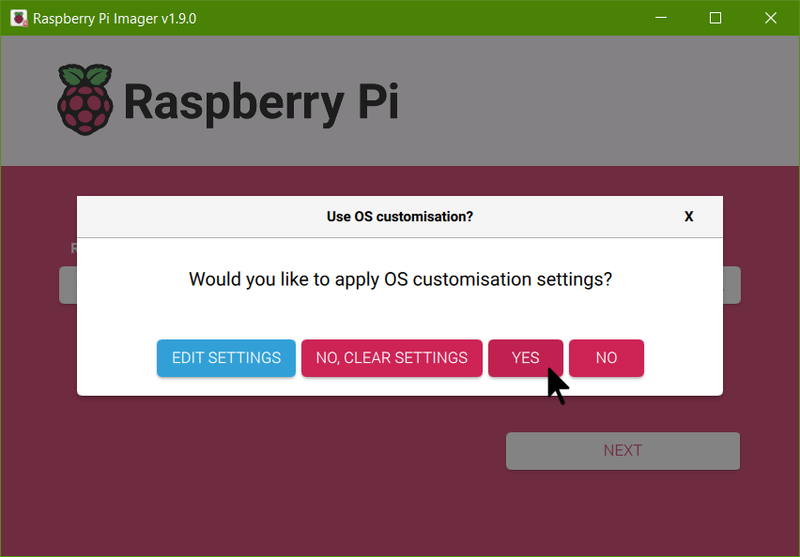
Then click on Yes. Raspberry Pi OS Lite will be written to the SD card:
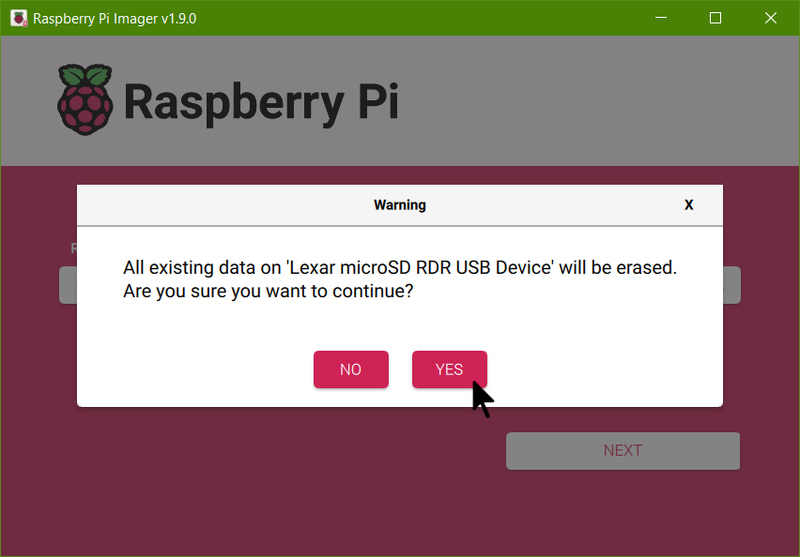
Confirm it is okay to overwrite your SD card:
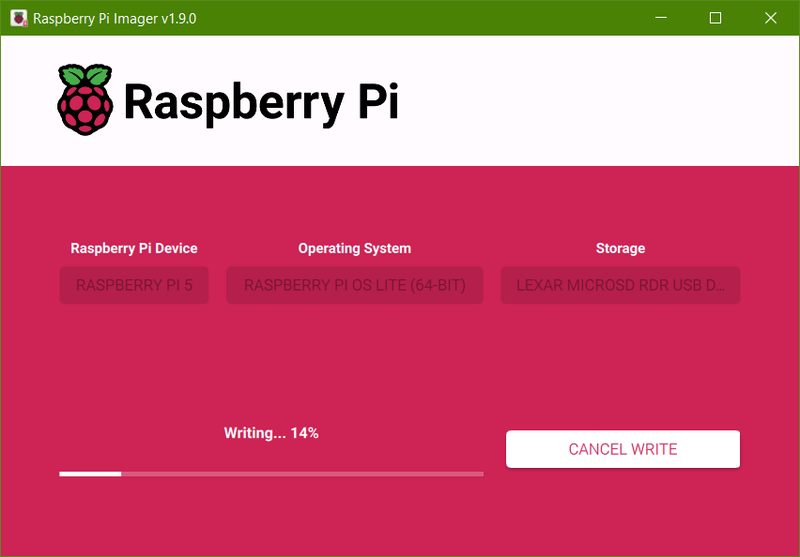
And wait for the OS to be written:
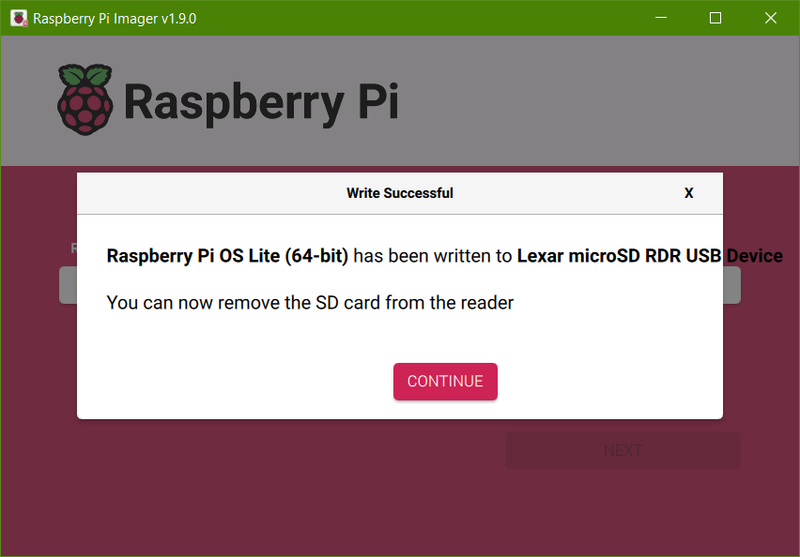
After it's finished writing, you can safely remove the SD card and insert it into your Raspberry Pi in the Picade Max.
Installing RetroPie
Installing RetroPie directly on the Raspberry Pi can take a while, so it's best to connect a keyboard to the Pi and do the installation there. This way, you won't run into issues with remote connections dropping and having to start the installation again.
After the Picade Max has started up, log in using the username and password you created earlier. As always, the first thing to do is update the OS to the latest version:
sudo apt update
sudo apt dist-upgrade
You need to install git to download RetroPie from GitHub.
sudo apt install git
The RetroPie maintainers have set up an installation script for us, so let’s go ahead and download it:
cd ~
git clone --depth=1 https://github.com/RetroPie/RetroPie-Setup.git
After downloading it, you can begin the installation.
cd RetroPie-Setup
sudo ./retropie_setup.sh
This might take a little while! When it’s done, please restart the Pi:
sudo reboot
You can find easy-to-follow setup instructions on the RetroPie website here.
Changing Settings
Since RetroPie uses the same Emulation Station software as Recalbox, changing settings is exactly the same as for Recalbox. We therefore refer you back to the Controlling Recalbox section. This also includes instuctions for setting up the sound card.
Installing Emulators and Games
RetroPie includes only a few emulators and doesn't have any games, so you'll need to add those on your own. If you'd like to download a ROM to practice with, the Tanglewood demo for Mega Drive is available for free on itch.io.
When you set up the operating system, you turned on SSH, which also means you can use SFTP (Secure FTP). You can use any FTP client to move files, but we suggest using WinSCP if you're on Windows or Filezilla (available for Windows, Mac or Linux) to transfer files to RetroPie.
RetroPie and Recalbox can use the same game files and system BIOSs, so you can share them between the two. To set things up, you need to place the system BIOSs in the folder /home/pi/RetroPie/BIOS, and the game files in /home/pi/RetroPie/roms. Make sure to organise the files into folders named after the game consoles they belong to. If you need help figuring out the names of the folders, you can check the RetroPie guide.
Hotkey Combinations
On the right hand side of the Picade Max is a black button, which is called the ‘Hotkey’ - this can be used in combination with other buttons to control RecalBox. You will find the following button combinations helpful.
- ‘Hotkey’ + ‘R3 [Main]’ to return to the home screen.
- ‘Hotkey’ + ‘A [Select]’ to bring up the in-game quick menu, allowing you to load and save game states so you can carry on playing later. It also enables you to change the controls used in the game.
- ‘Hotkey’ + ‘B [Back]’ to reset the game
- ‘Hotkey’ + ‘L1’ to save a screenshot (which is stored in the folder
/share/screenshots)
Configuring the Power Button
To make the power button on the left hand side of the Picade Max function, we need to make some setting changes.
Make sure that the Picade Max is connected to your network. Then, use a program like Putty or a terminal to connect using SSH (Secure Shell) to the Raspberry Pi. For example, if you’re using a Linux terminal, type the following to connect to your RetroPie:
ssh pi@retropie
Use the password you set when you wrote the SD card (the default is raspberry).
Edit the configuration file:
sudo nano /boot/firmware/config.txt
To make the power button safely turn off your Raspberry Pi, add these lines at the end of the file:
dtoverlay=gpio-shutdown,gpio_pin=17,active_low,debounce=2000
dtoverlay=gpio-poweroff,gpiopin=4,active_low
The debounce setting is optional, but makes it so the button has to be held down for 2 seconds (2000 milliseconds), to avoid accidental presses from turning off your Picade Max during your session.
Additionally, add this line to the file to ensure that the devices plugged into your Pi's USB ports receive the most power possible:
usb_max_current_enable=1
Reboot RetroPie for these to take effect.
Moving over to an SSD on your Pimoroni NVMe Base
If you’ve got a Pimoroni NVMe Base with an M.2 SSD you can move everything from the SD card to the SSD.
Connect to your Pi using SSH as shown above.
To check that your SSD is connected correctly, type:
ls /dev/nvme0
If the SSD cannot be found, the terminal will report:
ls: cannot access \'/dev/nvme0\': No such file or directory
In which case, turn off your Raspberry Pi and recheck the ribbon cable connections and the SSD installation. Remember that the clips on both the NVMe Base and Raspberry Pi 5 need to be folded/pressed back in place for the connections to work. Use this tutorial if you need help.
If the SSD is correctly connected, /dev/nvme0 will be repeated back in the terminal. All is good and you are ready to proceed. Perform the copy by typing:
sudo dd if=/dev/mmcblk0 of=/dev/nvme0n1 status=progress
Once everything has been copied over to the SSD, shutdown the Pi, remove the SD card, and restart the Pi. Recalbox should now be booting from the SSD. If it does not, you might have an old version of the firmware on your Pi, in which case you will need to prepare another SD card with Raspberry Pi OS Lite, put that in your Pi, boot it and follow the steps in our NVMe Base Learn Guide to update the firmware.
Updating the Picade Max Firmware
The Picade Max's USB Audio and USB Controller boards are powered by the Raspberry Pi RP2040. This means we can make our own custom firmware for them! To see if there are any firmware updates available and find how to update the boards, please visit the GitHub pages below:
Next Steps
Hopefully this guide has given you a brief overview of how to get started with Recalbox and Retropie - we hope you have lots of fun with your Picade Max. There's a ton more information on how to customise both systems at the links below (plus info on how you can support their development):
If you'd like to discuss Picade Max specifically, check out our forums or the Picade channel on our Discord:
Search above to find more great tutorials and guides.