Getting Started with Badger 2040
Badger 2040 is a programmable E Paper/eInk/EPD badge, powered by RP2040. Badger 2040 W is a programmable E Paper/eInk/EPD badge with 2.4GHz wireless connectivity, powered by Raspberry Pi Pico W. Both can go into a deep sleep mode between updates to preserve battery.
This beginner friendly tutorial will cover:
- how to plug in a battery
- how to get to grips with our BadgerOS launcher and examples
- how to get started programming Badger with MicroPython and Thonny
- some troubleshooting suggestions
⚠ This learn guide has been updated to work with our inhouse PicoGraphics library and the new standalone Badger 2040 repo. It will work with both Badger 2040 and Badger 2040 W (but you will probably need to update your software to the most recent version - scroll down to the bottom for instructions on how to do that).
What you'll need
- A Badger 2040 or Badger 2040 W
- A USB-A to USB-C cable (for programming Badger 2040)
- ... or a USB-A to micro-B cable (for programming Badger 2040 W)
- Some sort of battery if you want to disconnect Badger from your computer and update the display on the go - we'll discuss a few options and their pros and cons!
- A computer to program from (Windows, Mac or Linux/Raspberry Pi).
Batteries
AA and AAA batteries
The easiest way to supply your Badger with power is via some good old fashioned double or triple A batteries, connected in series. We'd suggest using a 2 x AAA battery pack, so that it will stick onto the back of Badger without being too heavy and unwieldy. You'll need a battery holder with a two pin JST-PH connector to be able to plug it in.
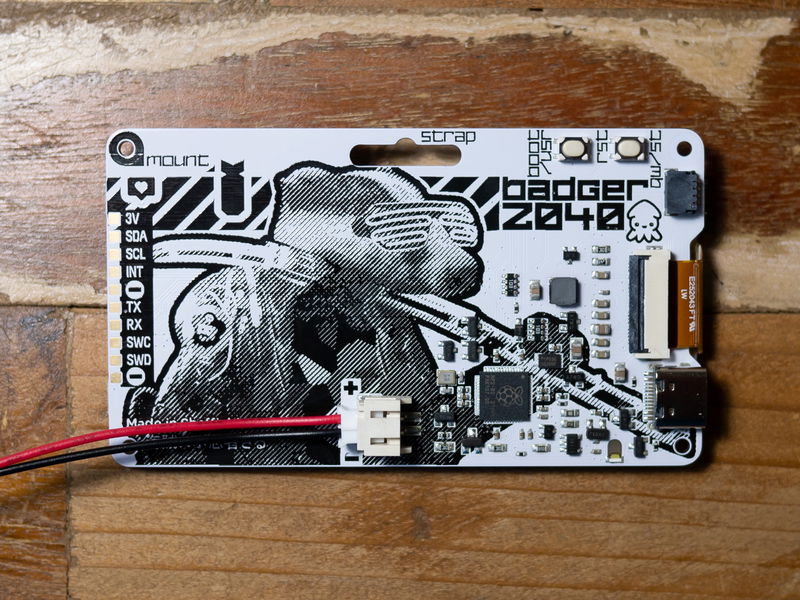
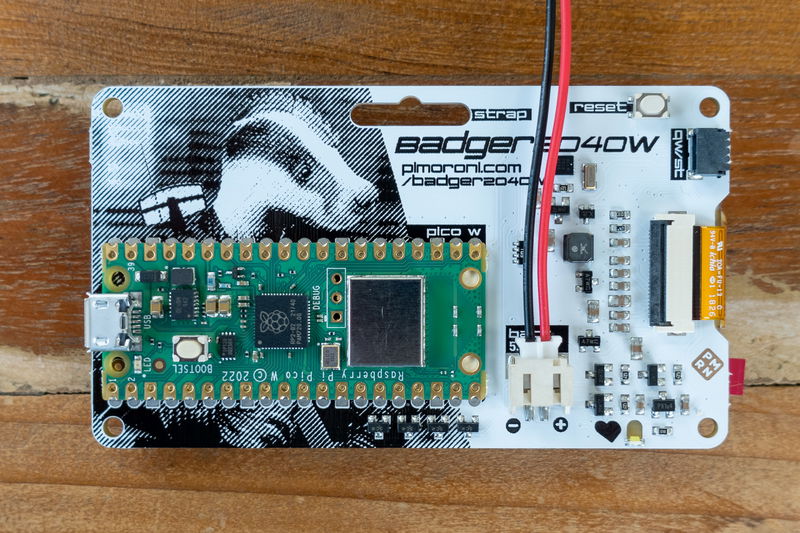
If you're planning on using rechargeable (NiMH) batteries you'll probably need to use a 3 x AAA battery holder - 2 NiMH batteries only put out 2.4V which is not enough to keep the wireless on Badger 2040 W happy (though it is enough for Badger 2040 to squeak by).
LiPo/LiIon batteries
If the person wearing the badge is an adult who knows what they're doing with LiPo batteries, you could power Badger from a LiPo battery. We really like our tiny 400mAH Galleon battery for this, as it has a hard plastic shell to protect it from damage. We stuck our LiPo to the back of Badger with a Velcro square to stop it from rattling around.

A few more things you should consider if you're using a LiPo:
- There's no battery protection included on Badger, so you should only use it with LiPo batteries that include internal protection (all ours do).
- If you've sourced a battery from elsewhere, double check that the red wire goes to + and the black wire goes to - on our board. Not all battery manufacturers attach their connectors the same way up!
- Unlike some of our other boards, Badger doesn't have battery charging circuitry onboard. You'll need to plug your battery into an external LiPo charger (like LiPo Amigo) to charge it.
Assembling the Badger Accessory Kit
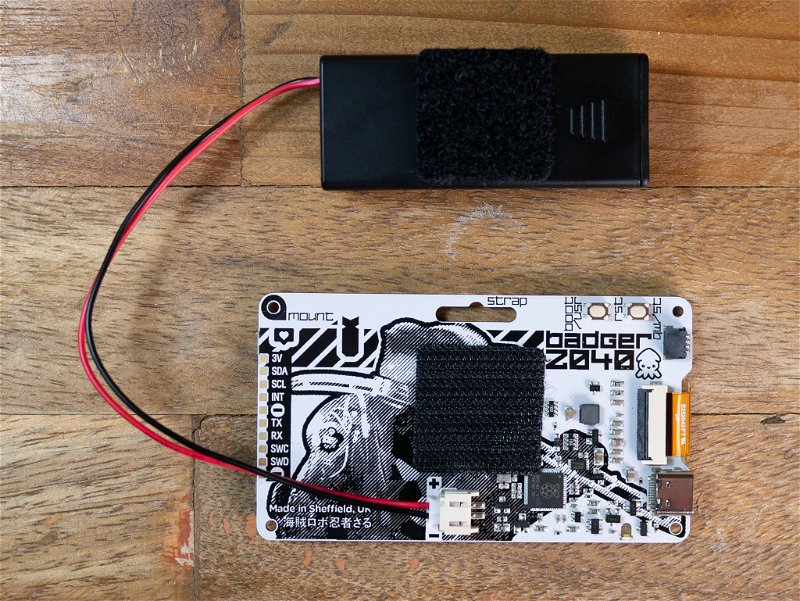
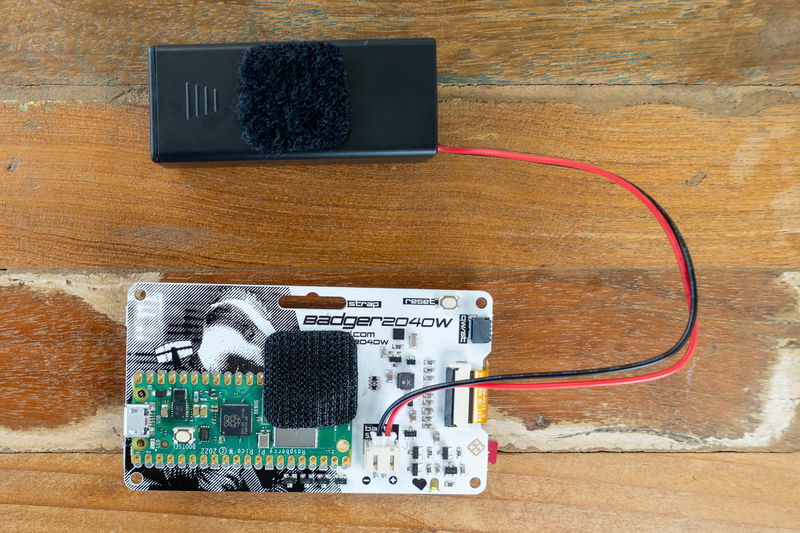
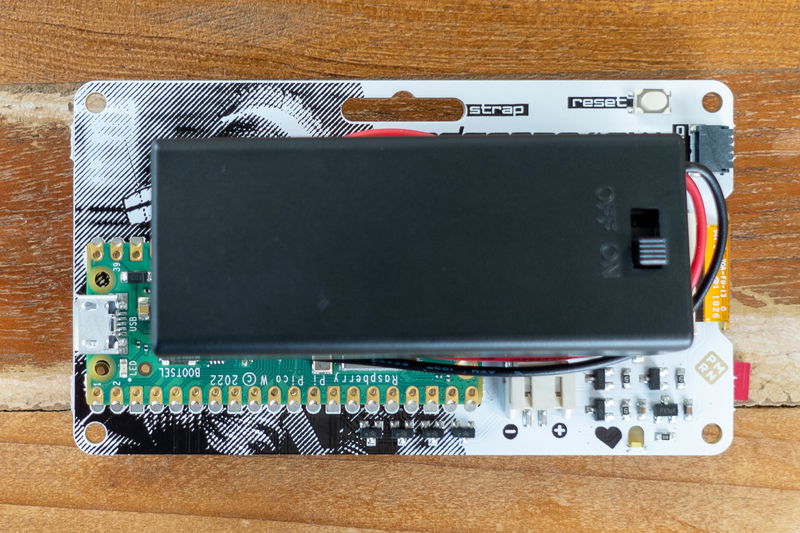
If you have one of our Badger accessory kits, it will come with some Velcro for sticking the battery pack to the back of Badger. Before you start sticking things down, experiment a little bit with the positioning of the battery pack:
- If you're hanging Badger from a lanyard you'll want to make sure the battery pack is balanced in the middle to avoid your badge hanging lopsided. We've put our square in the middle of Badger, but if you wanted you could cut it in half and stick half at each end of the battery pack.
- If you have a on/off switch on your battery bank and want to be able to use it, make sure to position it where it's accessible.
- With Badger 2040 W, make sure the BOOTSEL button on the Pico W remains accessible (in case you want to update the firmware on Badger in the future) and not squashed down by the battery pack.
- Once you're happy with the placement, press the squares down (avoiding pressing directly on the screen) and then wait 10 minutes for the adhesive to set.
Here's how it goes on Badger 2040:
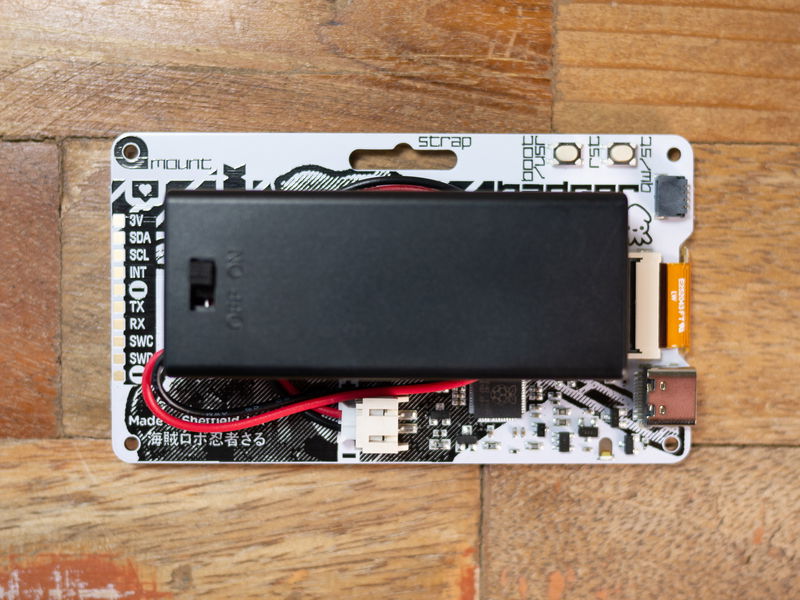
and Badger 2040 W:
MicroPython and Badger 2040
Our custom MicroPython build is the easiest way to get started with Badger 2040 and Badger 2040 W. It includes our tiny graphics library PicoGraphics, which contains lots of handy tools for drawing on the screen.
It also lets you change how quickly you update the display - faster updates will mean less saturated blacks and more ghosting on your display, so you'll need to decide whether speed or quality is more important for your application (our demos use a variety of update speeds, so you can see how they behave).
⚠Both varieties of Badger ship with MicroPython and BadgerOS examples pre-loaded. If you need to re-install them (or want to upgrade to the newest version), scroll down to the end of this article to learn how to do that.
Using Badger OS
Once you've got a battery connected (or if your Badger is plugged into USB power), you should be able to navigate around the launcher using the up and down arrows, and select an example by pressing A, B, or C. To return to the launcher when you're done with an example, press buttons A and C at the same time.
When powered by USB, Badger will stay awake all the time. When running on battery however, the launcher and the examples turn off automatically to conserve battery power. In our examples, we've made the LED light up when Badger is awake and consuming power, and turn off to let you know when the board is asleep. Press any front button to wake it up where you left off or press A and C together to return to the launcher.
Some of the Badger 2040 W examples need access to the internet to do their thing. Read on to learn how to give your Badger your wi-fi credentials!
Talking to Badger with Thonny
To program Badger (or to edit the files on it), you'll need to talk to it through an interpreter - we're using Thonny, which is available for Windows, Mac or Linux.
- Install the latest version of Thonny. We recommend downloading it from the Thonny website as package managers do not always have the newest version.
- Open up Thonny. Make sure the interpreter (shown in the box on the bottom right corner) is set to 'MicroPython (Raspberry Pi Pico)'.
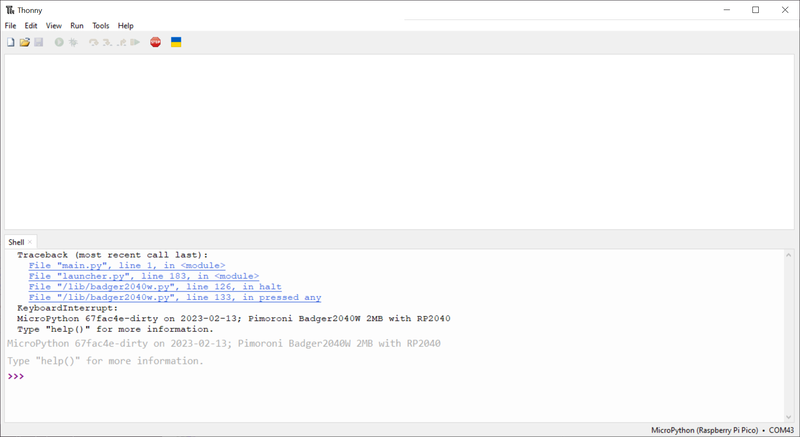
- Plug your Badger into your computer, if it's not plugged in already. Because Badger is busy running the launcher program, main.py will already be running, you'll need to interrupt it with the stop button in Thonny before sending it any instructions. In recent versions of Thonny, there's an option to interrupt running programs automatically - if you want to turn that on it's under Tools > Options > Interpreter > Interrupt working program on connect.
- After you press stop, you should get a MicroPython prompt that looks something like this. The >>> in the 'Shell' box tells you that Badger is talking to your computer and is ready to accept instructions.
If you're having trouble using Thonny to communicate with your board, there's some troubleshooting suggestions at the link below:
Editing files
Using Thonny, you can open up the .py example files on the device and edit them. To see the files on your board, you will need to have the Files window visible - if you can't see it, you can make it show up with View > Files.
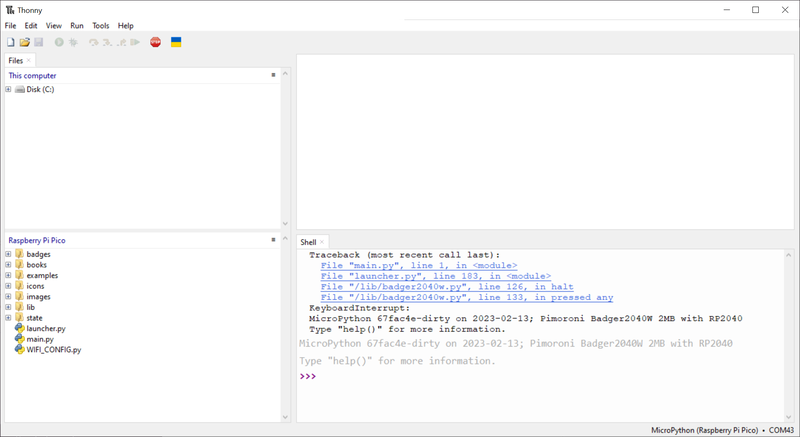
The top box can be used to browse the local files in on your computer, and the bottom box shows the files on your board. If you want to transfer files to (or from) your board, right click on the file you want to copy and select 'upload to /' or 'download to /'.
Adding your wireless credentials (Badger W only!)
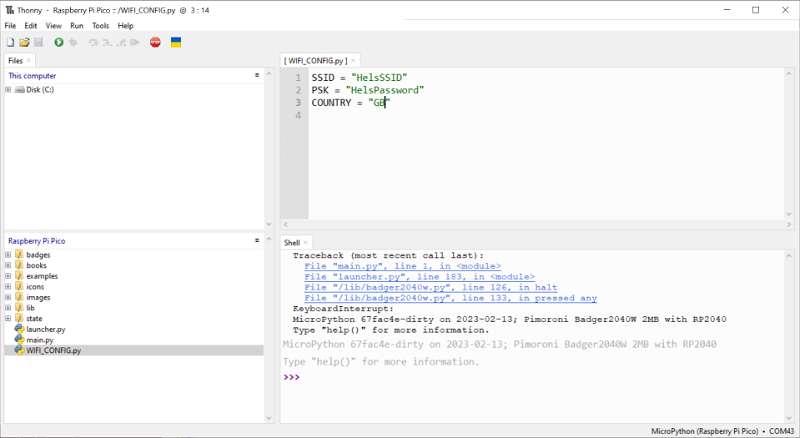
For the launcher examples that use wireless to work, your Pico W will need to know your wireless network details - these will be stored in a file called WIFI_CONFIG.py, which should already exist on Badger's filesystem.
Double click on it in the Files window to open it up, and edit in your network's SSID, password and country code (if you're in the UK like us then your country code should be "GB" - if not check this list). Note that SSID and password are case sensitive!
Once that's done, click the save icon in the toolbar to save your changes.
Hit the reset button on the back of Badger to reload the launcher - if you got your credentials correct hopefully now the wireless examples should be able to connect to the internet!
Customising the BadgerOS examples
Most of the examples can be tweaked to customise their behaviour. If you don't have it open already, you will want to have the Files window visible to do this, you can do this with View > Files.
You can find all our example MicroPython code in the examples directory, if you want to poke at it to see what it does.

Some of the examples have data files that you can edit, to customise the behaviour without having to edit the actual code.
badge.py
The data files for the badge example are stored in the badges directory on the device.
To change the text on the namebadge example, edit badge.txt. You can double click on badge.txt in the Files menu to open it up in Thonny (remember to save the file when you're done, and then hit reset on the board to reload the launcher).
To change the image, replace badge.jpg with another 104 x 128 pixel (non-progressive) jpeg.
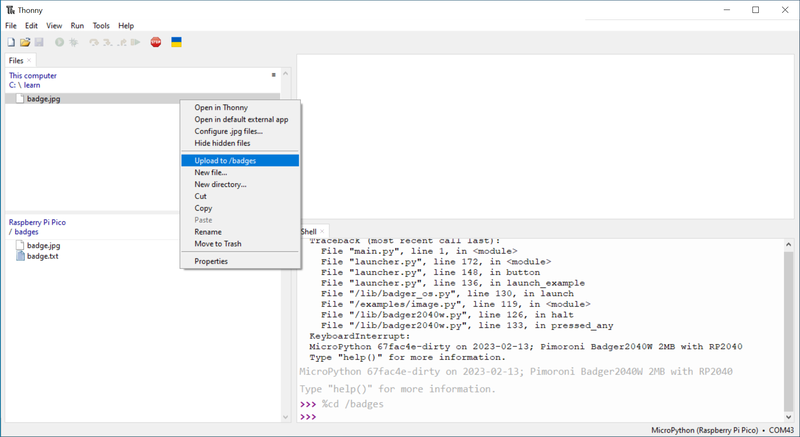
- Double click on the
badgesdirectory on the device (in the bottom files window) to navigate into it. - Navigate to where your image is stored on your computer in the top Files window, right click on it and select 'upload to /badges' to copy it to your Badger.
Our jpeg decoder jpegdec will attempt to dither your image into a 1-bit colour palette - we've found images with a lot of contrast turn out best. If you want more control over what your image will look like, you could convert it into a 1-bit image yourself using image editing software. In GIMP, you can do this with 'Image > Mode > Indexed... > Use black and white (1-bit) palette'.
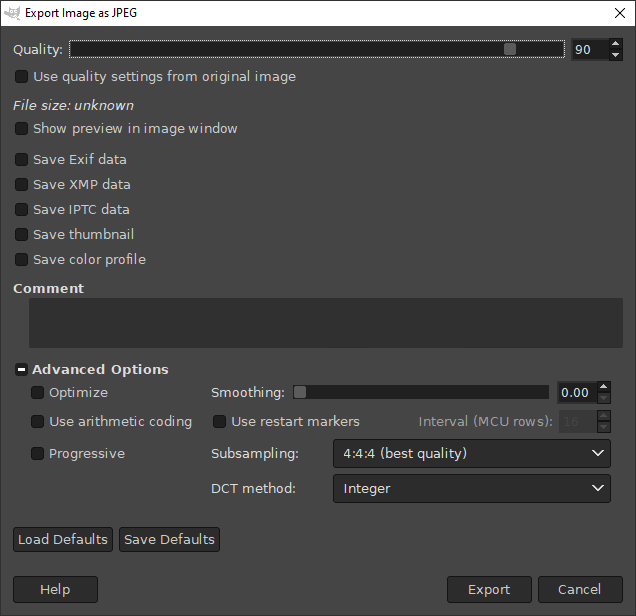
Make sure you export your jpeg without progressive encoding. We've had good results from turning off jpeg optimization as well (in GIMP, you can find these settings under 'advanced options').
ebook.py
This example comes with an excerpt from Wind in the Willows. Add another text file to the books directory for it to show up in the e-reader (if your new text file has a different file name, you'll also need to modify examples/ebook.py to point it at the correct file). You can find more free books (with text versions) at Project Gutenberg!
When running the example, you can press A and B to change the font style and size.
image.py
Add 296 x 128 pixel images to the /images directory using Thonny to get them to show up in the image example.
As noted above, they must be saved without progressive encoding to work with jpegdec.
list.py
To swap the demo checklist with one of your own, edit the contents of checklist.txt (this file will only appear when you first run this example). Each list item should be on a separate line.
cake
biscuits
bees
mashed potato
This example keeps track of which items are ticked/unticked using a file in the /states directory.
news.py (Badger W only!)
This example retrieves news stories from RSS feeds on the BBC site - switch between feeds with the A, B and C buttons, and cycle through news stories with the up and down buttons. You can change the feeds it monitors by changing the URLs in news.py- here's a list of some popular and regional ones.
qrgen.py
The data files for the QR code example are stored in the /qrcodes directory.
A sample data file called qrcode.txt will be created when you first run the example - you can then edit this file using Thonny to change the details shown. You can also add more text files to this directory (following the same formatting) to add more QR codes - scroll through them with the up and down buttons.
weather.py (Badger W only!)
This example grabs the current temperature and wind conditions from the Open Meteo API. By default it will show you the weather conditions in Sheffield-on-Sea - to change it to give you the weather in your location open up examples/weather.py and change the latitude and longitude (you can find out your own latitude and longitude by right clicking in Google Maps!).
Writing your own code
Ready to start writing your own code? Here's how to do some basic stuff with Badger.
Importing your Badger
Before you do anything else, you'll need to import the Badger 2040 MicroPython module and then create an instance of the Badger2040 class:
import badger2040
badger = badger2040.Badger2040()
All your Badger code will need to start with these two lines, and they're the same for Badger 2040 and Badger 2040 W.
If you want to be able to tell whether or not you have a Badger 2040 or a Badger 2040 W (and do different things in your code accordingly), you can do:
print(badger2040.is_wireless())
This command will return True if you have a Badger 2040 W, and False if you have a Badger 2040.
Lighting up the onboard LED
You can light up the white onboard LED with the following code - enter it line by line in the REPL (that's the bottom 'Shell' box in Thonny).
import badger2040
badger = badger2040.Badger2040()

badger.led(255)
Let's turn off the LED again, to be tidy!
badger.led(0)
Using the buttons
Here's a simple example showing how to use the buttons. Enter it in the REPL as before, or copy and paste the lot into a blank tab in Thonny, and press the green run button. Once it's running, pressing A should light up Badger's LED, and B will turn it off again.
import badger2040
badger = badger2040.Badger2040()

while True:
    if badger.pressed(badger2040.BUTTON_A):
        badger.led(255)
    if badger.pressed(badger2040.BUTTON_B):
        badger.led(0)
Here's a full list of constants for the buttons:
BUTTON_A
BUTTON_B
BUTTON_C
BUTTON_UP
BUTTON_DOWN
Writing text on the screen
Here's how to display text on the screen, in it's most basic form. You'll need to enter the boilerplate, as before:
import badger2040
badger = badger2040.Badger2040()

badger.set_pen(15)
badger.text("Hello Badger", 20, 20)
badger.update()
The rest of the code does this:
- Picks a pen colour to write with - 0 is black and 15 is white. This display will only show black or white, but if you pick a number in between 0 and 15 it will dither it to approximate a shade of grey.
- Writes text to the screen buffer - the '20, 20' is the x/y co-ordinates of the top left corner of the text.
- Updates the E Ink screen (you can draw multiple things to your screen buffer before triggering an update).
If you try writing more text to the screen, you will find that things you've drawn to the screen buffer will stick around until you overwrite them. To clear the screen and start with a clean slate:
badger.set_pen(0)
badger.clear()
badger.update()
The default font is "bitmap6", which is all capitals and can be a bit tricky to read. Here's we've switched to "bitmap8", and bumped up the text size a bit. We're also using a white background, and black text this time.
import badger2040
badger = badger2040.Badger2040()

badger.set_pen(15)
badger.clear()

badger.set_pen(0)
badger.set_font("bitmap8")
badger.text("Hello Badger", 20, 20, scale=3)
badger.update()
There's also some vector fonts to play with! They come out quite spidery and thin if you draw them one pixel wide, so we've added a set_thickness() function (just for Badger) that lets you beef them up a bit.
import badger2040
badger = badger2040.Badger2040()

badger.set_pen(15)
badger.clear()

badger.set_pen(0)
badger.set_font("sans")
badger.set_thickness(2)
badger.text("Hello Badger", 20, 40, scale=1)
badger.update()
More functions
There are more functions in the PicoGraphics library for drawing individual pixels, lines and shapes, plus .jpeg images. Find out more here:
You can find more info about Badger W specific board functions like update speeds and sleep/wake up here:
Next steps
Once you've got to grips with Thonny and our examples, why not add one of our breakouts into the mix to give your Badger some sensor smarts. If your breakout has a Qw/ST connector, you can plug it straight into Badger with a Qw/ST cable (if not, you can use one of these adaptors). There's a list of which of our breakouts are currently supported in our MicroPython build here.
As always, drop us a line on Twitter to tell us what you and Badger get up to - we'd love to know!
Troubleshooting
How do I make an example run whenever Badger's powered up?
Save your example as main.py if you want it to run automatically every time Badger is powered up or reset. It's a good idea to test your code is working as expected before you do this, as a malfunctioning main.py can lock up your Pico and stop it from communicating with Thonny.
How do I factory reset?
If you do find yourself with a malfunctioning main.py, you can delete all your programs from Badger's flash memory and start again from scratch by downloading this special .uf2 file and copying it to the Pico W whilst it's in bootloader/DFU mode. Once you've done that, you'll need to copy the MicroPython image across again - read on for how to do that.
You may also find clearing the flash to be useful if you encounter problems after upgrading to the newest version of MicroPython - just make sure you save any code you've been working on to your computer first!
How do I install MicroPython?
If you want to update your Badger to the newest version of MicroPython, here's how. You can also follow these instructions if something goes wrong, and you need to reinstall the files.
⚠Note that flashing a 'with-badger-os' .uf2 will overwrite any files saved on your Badger, so make sure to save any important code / images to your computer before you update.
First of all you'll need to download our most recent batteries included MicroPython image, and copy it to the Badger.
If you're brand new to Raspberry Pi Pico/RP2040s, you might find the step by step instructions in our Getting Started with Raspberry Pi Pico tutorial useful - it will show you how to install our custom MicroPython build and goes into more detail about how to use Thonny . Here's a quick TLDR!
Download the most recent MicroPython .uf2 from the Releases page of our badger2040 Github repository. Click on 'assets' to expand the list of files - for the version with examples built in you'll want to download
pimoroni-badger2040-vx.x.x-micropython-with-badger-os.uf2(for Badger 2040) orpimoroni-badger2040w-vx.x.x-micropython-with-badger-os.uf2(for Badger 2040 W). Make sure you download the correct one for your board!Connect Badger to your computer with a USB cable.
Hold down BOOT/USR (on Badger 2040) or the BOOTSEL button (on Badger 2040 W), and then tap the RESET button. This will put it into bootloader mode, and it should appear as a drive on your computer called RPI-RP2.
Copy the .uf2 file to the RPI-RP2 drive - once you've done that Badger will reboot.
'Thonny can't see my Badger / Device is Busy'
Double check you've got your interpreter set to 'Raspberry Pi Pico' and check you've pressed 'stop' to stop the launcher from running! You need the >>> prompt to be visible in the 'shell' window to be able to transfer files or send Python instructions to Badger.
Please note that you only need to hold down the the BOOTSEL button whilst putting Badger into bootloader mode so you can copy MicroPython to it, you don't need it to be in bootloader mode after that (unless you want to upload new firmware).
Search above to find more great tutorials and guides.