Assembling Wireless Plasma Kit
Wireless Plasma Kit will let you build an internet connected mood-light-in-a-bottle that's easy to program using MicroPython or CircuitPython.
In this beginner friendly tutorial, we'll show you:
how to put the bits in the kit together
how to program it using MicroPython and Thonny
a few tricks for hooking up other hardware and sensors
2025/4 - This guide has been updated to work with the new seperate Plasma repo.
What you'll need
- A Wireless Plasma Kit (we'll be showing your with our Skully Edition kit).
- A computer to program from (Windows, Mac or Linux/Raspberry Pi).
- Small flathead screwdriver for wrangling the screw terminals.
- Pair of scissors for separating the wire ends
Kit contents

You should have the following items in your kit. If you're missing something drop a message to support and they'll get it sorted.
- Plasma Stick 2040 W (with Pico W Aboard)
- A bottle (with a cork)
- 5m of WS2812/Neopixel-compatible addressable LED wire (50 LEDs)
- USB A to micro-B cable
- Velcro dots for attaching the board
If you have the BYOB Edition kit, it won't include the velcro dots or bottle.
About Plasma Stick
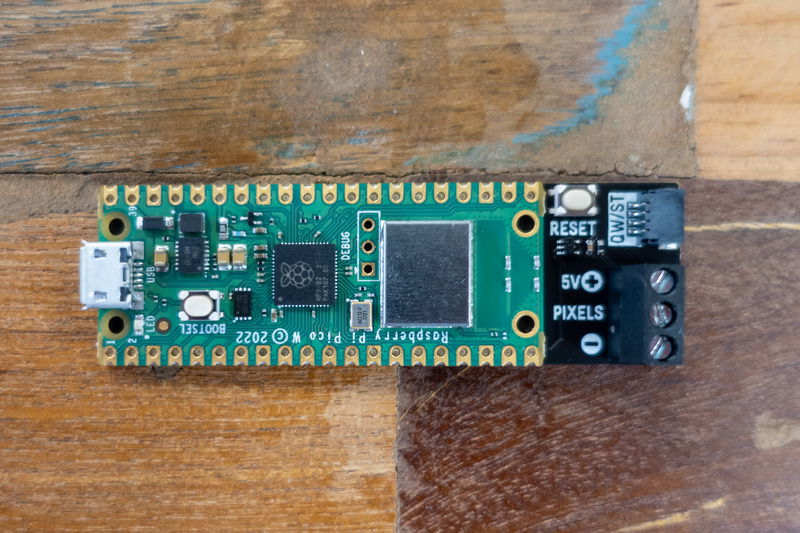
This board is your LED controller. We've added a set of screw terminals to make it easy to connect the LED wire and boost circuitry so that the LEDs get a nice clean 5V on the power and data lines (some LED strips don't work very well with 3.3V on their data lines). We've also added a reset button (because unplugging your USB cable all the time is tedious) and a Qw/ST (Qwiic/STEMMA QT) connector so you can connect it to other components , without soldering.
We've designed this board with doing cool LED things with wireless in mind, so it doesn't have current sensing or some of the other mod cons that you can find on Plasma 2040. You can also only use it with 5V WS2812/Neopixel/SK6812 LED strip (that's the kind that has three wires).
Assembling the kit
Plugging in the LEDs
Unfurl the LEDs and locate the end that has bare wires poking out. This is the end that needs connecting to the screw connectors.
These LEDs are WS2812 LEDs, so they have three wires - 5V (+), data (PIXELS) and ground (-). With more traditional LED strips you can tell which wire is which from the markings on the strip, but with this LED wire the 5v (+) wire is the one that's marked with dots. The data (PIXELS) line is the one in the middle, and the ground (-) line is the one that's leftover.
To make it easier to plug in the wires we'd suggest separating them a bit at the end - snip the insulation between the wires with scissors, taking care not to nick the wires.
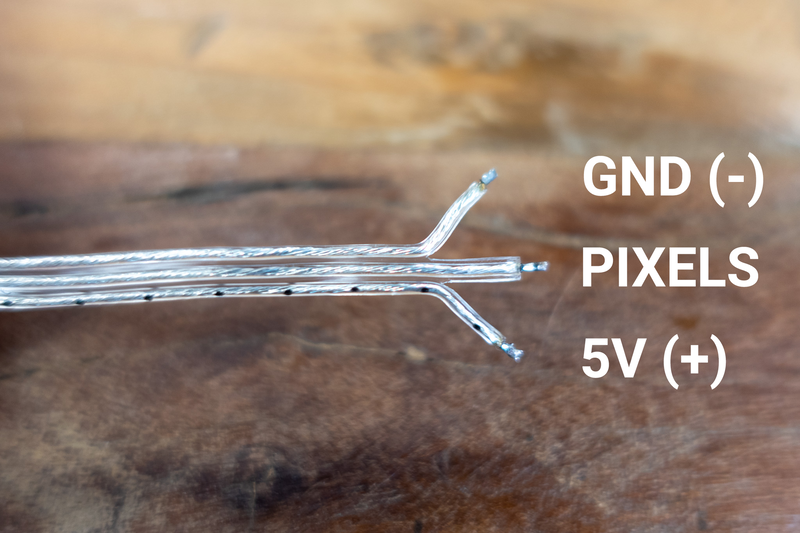 Loosen the screws on the connector on Plasma Stick with a flathead screwdriver, poke the wire ends into the connector, and tighten the screws back up. You'll probably find it easier to do one wire at a time. Give the wires a little tug when you're done to make sure they're anchored solidly in the connector. Be sure that the terminal is gripping the metal wire, and not the plastic sleeve (you can strip off a little bit of the plastic sleeve to expose more of the wire if that helps).

Once the wires are securely fastened in place that's the fiddly bit done - you can start feeding the other end of your LED wire in to the bottle. We used a pencil to help poke the LEDs into the bottle and make sure they were nicely distributed.
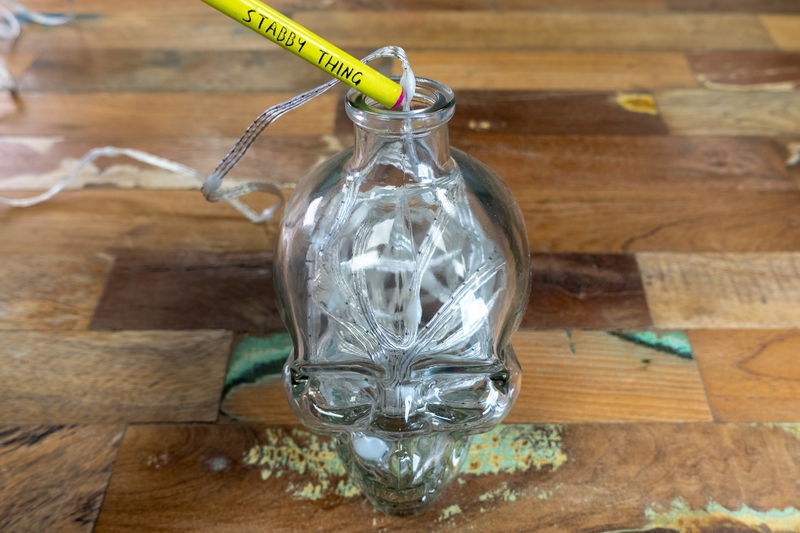
If you have a Star bottle kit, you might find that getting the LEDs evenly distributed is a bit trickier. We ended up making a curved tool out of thick wire to help poke the LEDs into the points.
Sticking Plasma Stick to the bottle
We've included some Velcro dots for sticking the controller board to the bottle so it's out of the way - we mounted ours on the flat surface on the rear of the skull. We found it helpful to stick both sides of the dots to the bottle first to get the placement right, and then add the Plasma Stick.
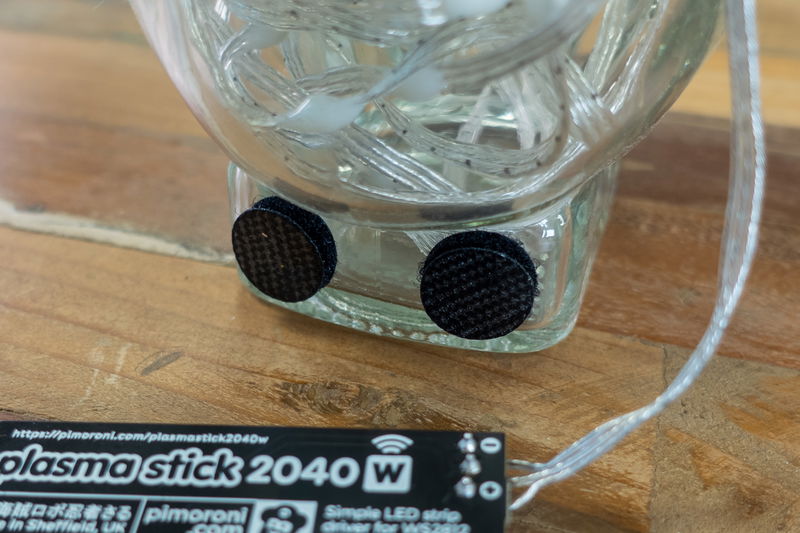
Once you're happy with the placement, make sure they're securely pressed down to both surfaces - the adhesive will take 10 minutes to achieve full stickiness.
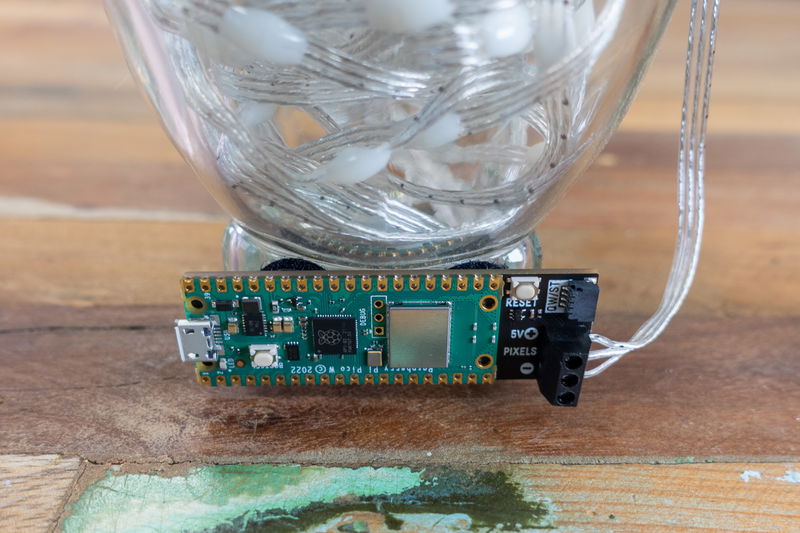
Feed any excess wire into the bottle, and plug in the cork to keep it in place (and to stop the LED magic from escaping).
Plugging in the USB cable
Plug the little end of your USB cable into the micro B connector on Plasma Stick, and the big end into your computer (or some other source of USB power). We've preloaded Plasma Stick with software, so hopefully now some stuff should happen!
⚠ Help! No stuff is happening!
If nothing lights up, then double check you plugged the correct wires into the correct screw terminals and they're anchored securely in the connector.
Running the examples
The demo script that we've loaded on Plasma Stick looks for a wifi connection, and if it can't connect to one it generates some spooky rainbows (a green and orange triangle wave that runs up and down the LEDs). Once you've finished enjoying those, you'll probably want to start modifying the code, or give your board the capabilities to connect to your wifi so it can do some other stuff!
Talking to Plasma Stick with Thonny
When it's running MicroPython, Plasma Stick won't show up as a drive on your computer. To edit files on it or run code on it, you'll need to talk to it through an interpreter - we're using Thonny, which is available for Windows, Mac or Linux.
- Install Thonny
- Open up Thonny. Make sure the interpreter (shown in the box on the bottom right corner) is set to 'MicroPython (Raspberry Pi Pico)'.
- Plug Plasma Stick into your computer, if it's not plugged in already. Because main.py will already be running, you'll need to stop it with the stop button in Thonny before sending it any instructions.
- After you press stop, you should get a MicroPython prompt that looks something like this. The flashing cursor next to the >>> in the 'Shell' box tells you that Plasma Stick is talking to your computer and is ready to accept instructions.
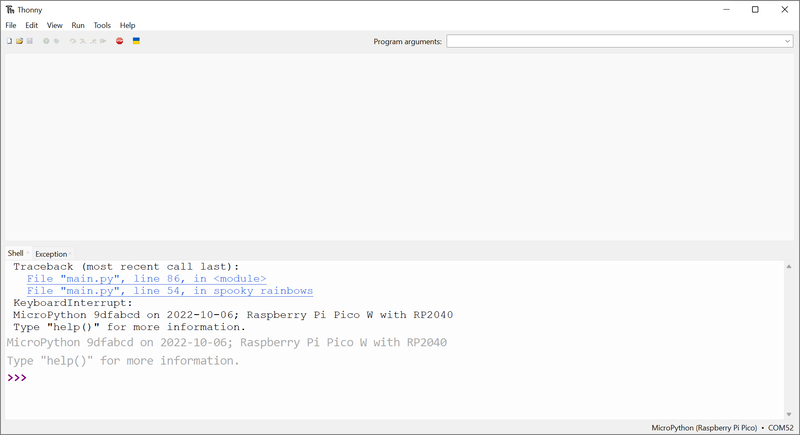
If you're having trouble using Thonny to communicate with your board, there's some troubleshooting suggestions at the link below:
Editing files
Using Thonny, you can open up the .py example files on the device and edit them. To see the files on your board, you will need to have the Files window visible - if you can't see it, you can make it show up with View > Files.
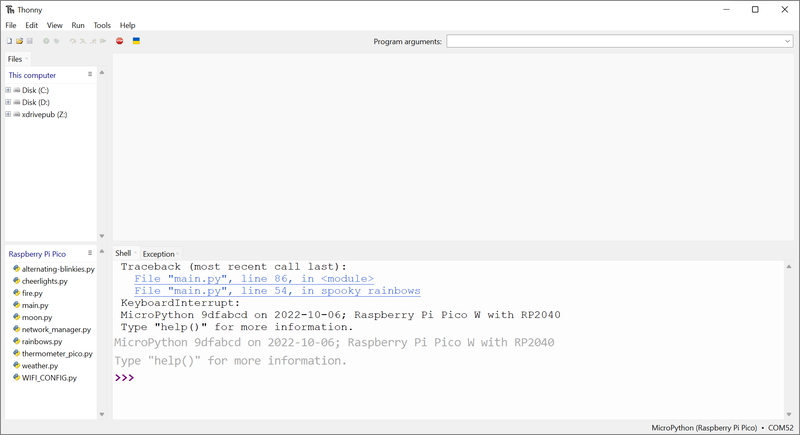
The top box can be used to browse the local files in on your computer, and the bottom box shows the files on your board. If you want to transfer files to (or from) your board, right click on the file you want to copy and select 'upload to /' or 'download to /'.
Making the rainbows less spooky
"But it is no longer Halloween", I hear you cry. "Please, I need a more appropriately coloured LED effect to display to my fancy festive guests, otherwise they will point and laugh at me!"
Open up main.py in Thonny by double clicking on it in the Files window and look for the function that starts def spooky_rainbows(): This section of code generates a triangle wave that moves up and down the LEDs, with colours picked from a specific segment of the Hue Saturation Value (HSV) colour wheel (if you scroll down to the bottom of that page, there's a useful graphic that shows you where different colours are located on the wheel). You can change the colours by changing the numbers next to HUE_START and HUE_END - try 180 to 240 degrees for an icy blue effect.
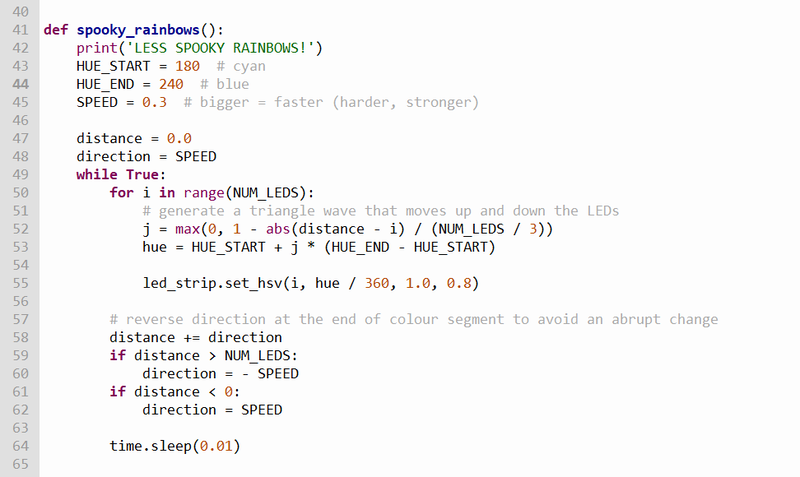
Press the green run button to save your changes and run your code.
We can make things icier still by turning down the Saturation a bit - find this line of code in the same function. This is the line that actually sets the colour of the LEDs.
led_strip.set_hsv(i, hue / 360, 1.0, 0.8)
Change the Saturation value to 0.75 (that's 75% colour saturation), like this:
led_strip.set_hsv(i, hue / 360, 0.75, 0.8)
Any effect which involves cycling rainbows or shifting colours gradually will probably involve adjusting the Hue, so HSV is a very handy thing to learn about!
Adding your wireless credentials
For the examples that use wireless to work, your Pico W will need to know your wireless network details. Double click on the copy of WIFI_CONFIG.py that's on your Pico W to open it up. Add your network's SSID, password and country code (if you're in the UK like us then your country code should be "GB" - if not check this list). Note that SSID and password are case sensitive!
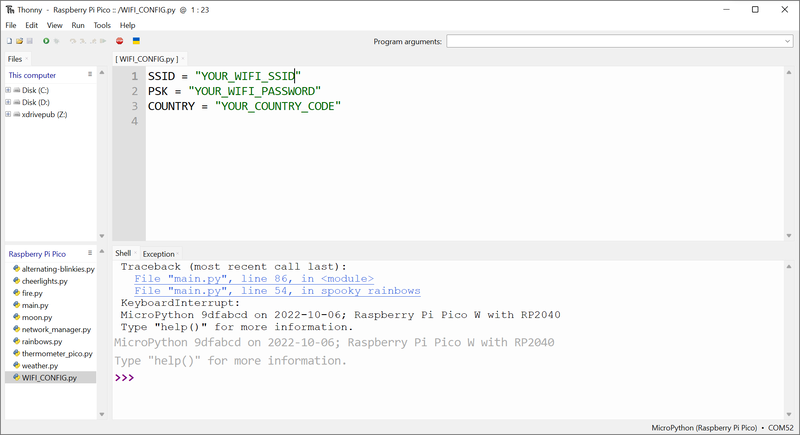
⚠ Note that if you're running the most recent version of the MicroPython firmware, the file that stores your wifi credentials will be called secrets.py, not WIFI_CONFIG.py.
Once you've finished editing, click save, and then hit the RESET button to reboot the board. When it tries to connect this time (and if you got your credentials correct), you should get...
#fearlights
Instead of spooky (or icy) rainbows, once the board has finishing connecting the LEDs will now show the most recent Cheerlights colour.
Cheerlights is a simple API that controls the colour of LED skulls, dinosaurs and other fun illuminated things all over the world. Tweet a colour @cheerlights (or with the #cheerlights hashtag) to change the colour of everybody's lights. This example polls the API every 2 minutes, so it might take a little while for your light to change.
Find out more here:
Other examples
There's a bunch of other preloaded examples too. weather.py connects to a weather API and fills your bottle with appropriate LED effects. moon.py makes your bottle glow brighter as it gets closer to midnight. And there's a couple of simple LED effects to get you started customising/coding up your own decor.
Double click on an example to open it up and press the green run button to start it running. If you want to make your code run every time the Pico is powered up (useful if you want to untether your bottle from your computer), replace the contents of main.py with some different code.
If you accidentally overwrite/lose something, don't worry - it's easy to re-install the firmware and examples. Here's how to do that!
Installing MicroPython and the examples
- Hop over to the Releases page of our Plasma Github repo, and download the most recent 'with-filesystem' .uf2 file for Plasma Stick. Note that flashing a 'with-filesystem' build will overwrite Plasma's existing filesystem, so if you've got important code saved to your Plasma be sure to back it up to your computer before continuing.
- Connect Plasma to your computer with a USB-C cable, if it's not already.
- Put Plasma into bootloader mode by holding down the BOOTSEL button whilst tapping RESET.
- Drag and drop the downloaded .uf2 file to the "RPI-RP2" drive that appears.
- After a few moments your device should reset, and the board should start running
main.py.
Adding moar hardware
PIR sensor
For Halloween, we wanted to rig up something spooky to surprise unfortunate Pirate HQ guests. We connected a PIR infrared motion sensor up to the Qw/ST connector using a Qw/ST to DuPont socket cable. We used one of these simple micro PIR sensors a) because they work nicely with 3.3V and b) they happen to anchor neatly into a glass eye socket with a blob of blu-tak, making your skull into a cool cyborg.
The pin labelled V on the sensor is power - so connect it to the red wire from the Qw/ST cable. G is ground, that goes to the black wire. Either the blue or the yellow wires can be used for data (S on the sensor), our example uses the yellow wire (GP5). You don't need to connect the other wire, so tuck it away safely.
You can find the code for the PIR example here:
Once it's running on your Plasma Stick, the sensor will toggle its data pin high when it detects movement. When the Pico W receives this signal, it will randomly trigger a different LED effect.
Temperature and CO2 sensing
What scares us? Getting too hot and having to spend time in places with poor ventilation, of course. Our bottle makes a really neat eye-catching sensor display - we've made examples that change colour based on readings from our BME280 Temperature, Humidity and Pressure Sensor and SCD41 CO2 Sensor breakout, but it would be easy to adapt this code to work with other sensors if you wanted.
We've had a Plasma 2040 powered carbon dioxide sensing skull living at Pirate HQ for a while (it was our inspiration for making this kit, in fact) and he does a great job of reminding us when it's time to open a window.
Both these breakouts have Qw/ST connectors, so you can plug them straight in to Plasma Stick with a Qw/ST cable.
Adjusting the colours with an encoder
Plasma Stick has no user buttons, so how can we change the colour of our lights if we don't have a computer handy to program it with? This example uses an RGB Encoder breakout to adjust the hue. Because the encoder breakout has its own RGB lighting, we can even set it to match!
This breakout doesn't have a Qw/ST connector, so we needed to use a Qw/ST cable coupled with a Qw/ST to Breakout Garden adapter to plug it in.
Keeping time with an RTC
If you've tried out the moon.py example untethered from a computer, you might have noticed that it can't tell the correct time when it doesn't have access to Thonny. If you're making something clock related (or something that adjusts the lights depending on the time of day, perhaps?) you might want to consider adding a Real Time Clock breakout, which has its own tiny battery to keep track of the correct time, even when your Pico W is unpowered.
If you're using a brand new RTC breakout you'll need to do some setup and set the correct time before running the code above - you can do that by running this code in Thonny:
This breakout doesn't have a Qw/ST connector, so we needed to use a Qw/ST cable coupled with a Qw/ST to Breakout Garden adapter to plug it in.
Next steps
Ready to start making your own examples and effects? Check out our Plasma 2040 tutorial for an introduction to the basic functions in the Plasma library, such as controlling the colour of individual and multiple LEDs. You might also find the Plasma function reference handy. As always, we'd love to see what you come up with - do consider sharing your projects with us on Twitter or our forums!
Search above to find more great tutorials and guides.